

|
|
|
|
| Introduction | ||||
| Charcoal | ||||
| Conté Crayon | ||||
| Crayon | ||||
| Cubist | ||||
| Dabble | ||||
| Impressionist | ||||
| Palette Knife | ||||
| Pastels | ||||
| Pen and Ink | ||||
| Pointillist | ||||
| Scraperboard | ||||
| Sketch Pad | ||||
| Watercolour | ||||
| Water Marker | ||||
| Wave Paper | ||||
3. Crayon.
Crayon makes an image look like a wax crayon drawing. You can specify the crayon pressure and create dark outlines around elements in the image.
At first glance, the Crayon Art Stroke may sound like it will be very similar to Conte Crayon art stroke. Well, it is and yet it isn't. It is certainly different enough to be added to PHOTO-PAINT as a separate effect. If anything, the Crayon art stroke is more similar to the Charcoal art stroke, except that it renders images in colour rather than in grayscale.
Unlike Conte Crayon, neither crayon colours nor the paper colour
can be the selected or altered.
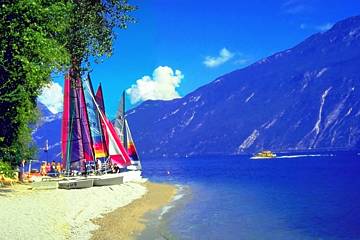
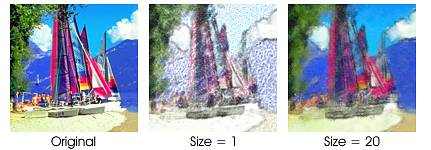
1. Open your image. Crayon seems to work best with Landscapes, scenes and objects, rather than Portraits. The Crayon art stroke tends to lose quite a bit of detail from the original and add some blur, which may make personalities within portraits more difficult to recognize. For the example here I have chosen image 798023.WI from the PHOTOS/THEBEACH folder of CD#3 of CorelDRAW suite 8. (Fig 1).
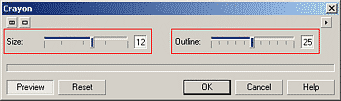
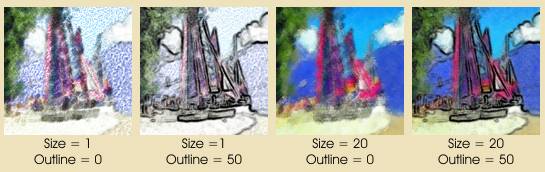
2. Open the Crayon dialogue box - Effects > Art Strokes > Crayon. There are only two parameters: Size and Outline but both of these can be used effectively. (Fig 2)
3. First, click the Reset button and observe the result. (Fig 3)
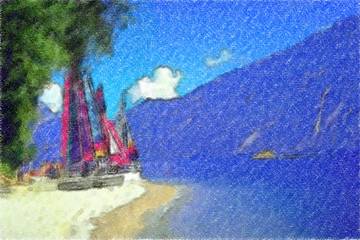
4. Now lets look at the Size parameter (has values of 1-20). This Crayon art stroke simulates short, dab-like crayon strokes. Increasing the Size parameter increases both the size of the dab as well as the number of dabs. Therefore a small Size value results in lots of white, underlying 'canvas' showing through the 'drawing'. Increasing the Size value adds many more 'strokes' thus increasing dab density, and overall colour saturation and detail. (Fig 4)
5. The Outline parameter (with values of 0-50) adds dark lines to contrasting regions, simulating an outline. The larger the Outline value, the more prominent the outline. Interestingly, increasing the value of the outline parameter also reduces the intensity of the dabs, making the whole image appear lighter. This additional effect may help increase the contrast between the outlines and the image, helping to strengthen the outline effect. Fig 5.
Further Example, Fig 6
| « Prev | || | || | Next » |
| - More Tutorials - | - Contact Me - | |
| - Copyright © 2003 David Mutch & Visionary Voyager Corporation P/L - |