by
David
Mutch
Aug, 2003
©
|
by
© |
Align & Distribute: Corel Photo-Paint’s Powerful Layout Tool
PART 7: Distributing Objects.
The Distribute tab on the Align & Distribute dialogue box allows you to space objects according to a many different criteria.
Just like Align, you can distribute objects according to the image/document boundaries, to the extent (boundary) of selected objects, or according to user- specified amounts. Also just like Align, you can use the objects’ centers or edges to determine the spacing between objects.
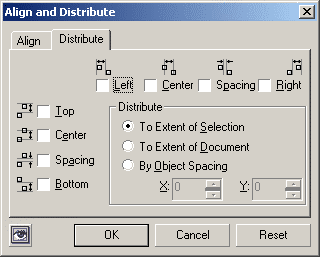 |
Fig 61. The Distribution Tab of th Align and Distribute dialogue box. |
As you can see, the Distribute dialogue is very similar to that of Align, so you already know a lot about how to use it. The significant differences are:
- use of selection and document ‘extents’
- ability to specify precise spacing sizes, ignoring those forced by extents
- the inclusion of ‘spacing’ choices in addition to edge and center choices for horizontal and vertical distributions.
Here’s what the main distribution options do:
- To Extent of Selection - evenly spaces the selected objects
- To Extent of Document - evenly spaces the objects across the image
- By Object Spacing - lets you specify the precise distance between objects in X and Y planes.
To distribute objects, you need to select more than one object. If only a single object is selected, all of the options on the Distribute tab become unavailable (grayed out).
You can align and distribute objects all in one step, before you have to commit the action, by first aligning them using the commands in the Align, the switching to the Distribute Tab to set up the spacing. When live preview is activated, Photo-Paint shows you the actual full-size result you would get right in the image you are working on, rather than via a tiny preview panel.
It is important to note however that the operations you perform in the Align Tab and in the Distribute Tab are linked. The result is dependent on the settings in both dialogues and a change in some choices in one dialogue can cause a previously made choice in the other tab to be neutralized because they are incompatible.
We will look at this in more detail soon.
First, lets start with a set of objects that are already aligned, as this makes it easier to understand the basics of the Distribute commands.
To Extent of Selection.
This setting determines the relative positions of all the objects according to the existing positions of the uppermost, lowest, farthest right and farthest left objects within the selection.
If the objects are already aligned according to their VERTICAL centers you can use the HORIZONTAL distribution methods:
 |
Fig 62. The basic arrangement of objects before distribution. |
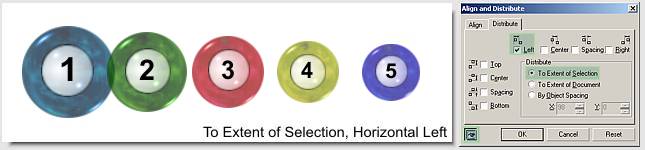 |
Fig 63. To Extent of Selection, Horizontal Left |
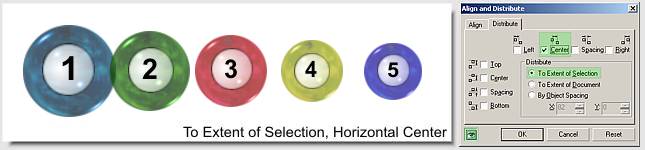 |
Fig 64. To Extent of Selection, Horizontal Center |
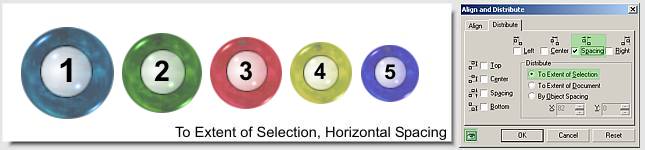 |
Fig 65. To Extent of Selection, Horizontal Spacing |
 |
Fig 66. To Extent of Selection, Horizontal Right. |
If the objects are already aligned HORIZONTALLY you can use the VERTICAL distribution methods.
Here are a few examples:
 |
 |
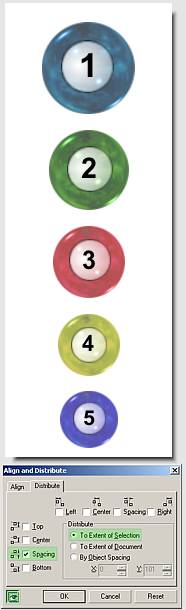 |
Fig 67. The basic arrangement of objects before distribution. |
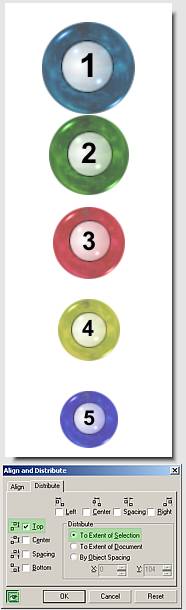
Fig 68. To Extent of Selection, Vertical Top |
Fig 69. To Extent of Selection, Vertical Spacing. |
To Extent of Document.
This setting automatically shifts the positions of the objects closest to the document boundaries until their edges touch the edge of the document. The spacing is then determined from these new extremities. Here are two of the four horizontal possibilities and two of the four vertical possibilities:
 |
Fig 70. To Extent of Document, Horizontal Left. |
 |
Fig 71. To Extent of Document, Horizontal Spacing. |
 |
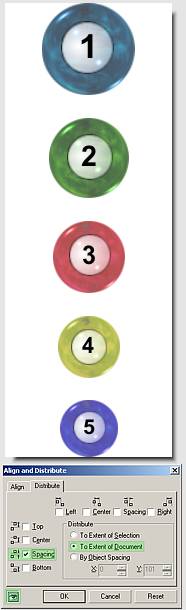 |
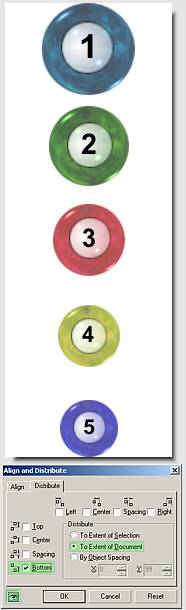
Fig 72. To Extent of Document, Vertical Bottom. |
Fig 73. To Extent of Document, Vertical Spacing. |
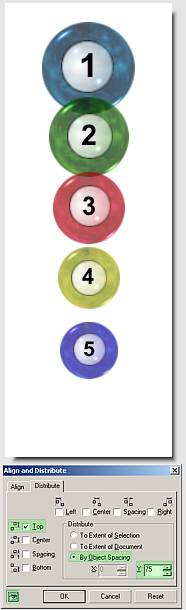
By Object Spacing.
This type of distribution option allows the user to specify an exact amount of spacing between objects, according to the choice of distribution method. The distribution will always use either the LEFT-most or TOP-most object as the starting point for the distribution, regardless of which object is the Active object within a selected series. Here are a few examples:
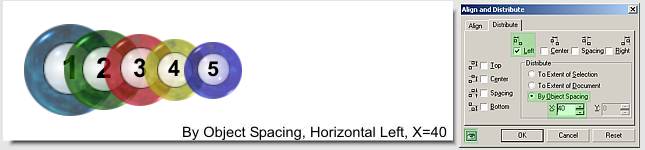 |
Fig 74. By Object Spacing, Horizontal Left, X=40. |
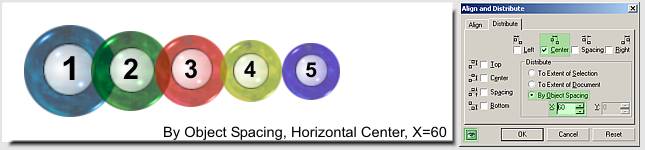 |
Fig 75. By Object Spacing, Horizontal Center, X=60. |
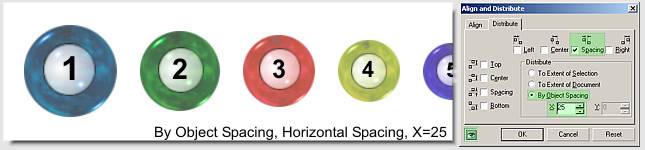 |
Fig 76. By Object Spacing, Horizontal Spacing, X=25. |
 |
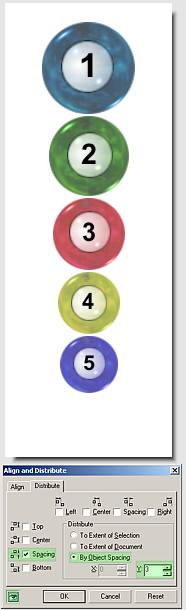 |
Fig 77. By Object Spacing, Vertical Top, Y=75. |
Fig 78. By Object Spacing, Vertical Spacing, Y=3. |
Using the Object Spacing method, the objects can be distributed using Negative values!
Here’s an example:
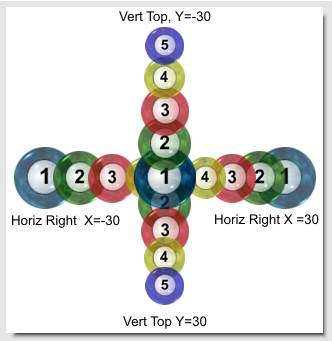 |
Fig 79. The 5 objects were aligned to the center of the image. Object order was 1-5, lowest to highest. Objects were grouped, then duplicated 3 times. Each group was then successively ungrouped, a distribution performed, the regrouped and labelled. |
Straight and Diagonal Lines.
You can also make perfect straight and diagonal lines using the By Object Spacing method in the Distribute panel, even without using any alignment steps.
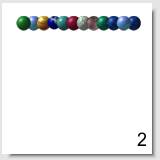
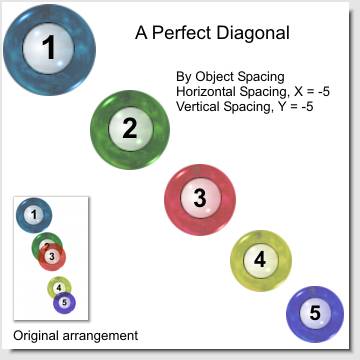 |
Fig 80. Distributing objects in diagonal line formation. The formation may take several steps to complete however. Refer to Figs 81-84 for a step-by step description. |
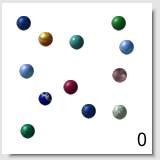
Even if all the objects in your document are randomly positioned all over the page, and in random order in the Objects Docker, you can use Distribute to create evenly distributed straight lines and shapes. Each step in the sequence below is performed as a separate distribute step (press OK in the Distribute box after each step).
 |
 |
|
Fig
81a. Step
0. |
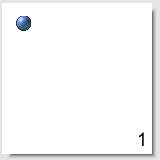
Fig
81b. Step1. |
 |
 |
|
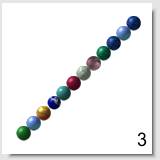
Fig
81c. Step
2. |
Fig
81d. Step
3. |
Of course an easier way to do this would be to create a Grid, turn on snap to Grid and drop each object onto the grid. But what if you had hundreds of objects - then the Distribute method would be quicker and easier.
Align
& Distribute Incompatibilities.
(VA + VD = 0, HA + HA = 0):
In many instances you can perform both Alignments and Distributions in a single step using both tabs of the dialogue box.
However you need to be aware that some actions do cancel out and neutralize some previous actions.
For instance, if you align objects using vertical criteria in the Align tab and then attempt to distribute using vertically, the second action will cause the first action to be reset and the object will return to their previous configuration.
Similarly, if you align objects using horizontally criteria and then attempt to distribute them horizontally the initial alignment will be reset.
| << PREV | tôp | NEXT >> |
![]()
| - More Tutorials - | - Contact Me - | |