by
David
Mutch
Aug, 2003
©
|
by
© |
Align & Distribute: Corel Photo-Paint’s Powerful Layout Tool
PART 8: Aligning Masks.
In addition to aligning objects, Corel Photo-Paint also allows you to align masks. But as you can only manipulate one mask at a time in Photo-Paint during normal operations*, there is no feature for distributing masks.
Start by creating a mask in whatever manner you wish. The mask can be contiguous (all one piece) or made up of non connected pieces. It is still only a single mask. The mask can be visible in either marquee or overlay mode, or even totally invisible - the Mask Align still works. However it certainly makes it easier if you display the mask in either marquee or overlay mode, so you can see what’s happening in your image.
Use Mask > Align to display the Mask Align dialogue box.
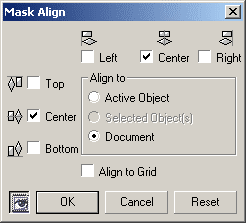 |
Fig 82. The Mask Align Dialogue box in its default state. |
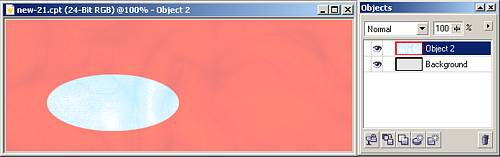
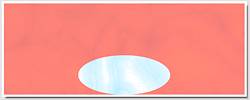
Fig 83 shows the simple image setup I’ll be using for most of this section. There is one simple object and a background, and an oval-shaped mask displayed in overlay mode.
 |
|
Fig 83. The simple oval-shaped mask used for the following demonstrations using the Mask Align commands. The mask is displayed in Overlay mode. Object 2 is a simple filled object the same size as the background. |
The Mask Align dialogue box (Fig 82) looks very similar to the Align tab section of the Object Align and Distribute dialogue box. There are vertical and horizontal alignment checkboxes, the option to align the mask either to the Active object, a set of selected objects, or to the document boundaries.
Also, just like Align for objects, you can preview the changes to mask alignment live in your image before you commit the action, avoiding unnecessary UNDO and retry steps.
The Mask Align dialogue box displays with Horizontal and Vertical centers already checked in Align To Document mode with Live Preview already turned on. If You are working on an image with only a single object or background, the Align To Selected Object/s mode will not be available.
Mask Align: To Document.
This option forces the edge of the mask t be aligned to the edges of the image.
 |
 |
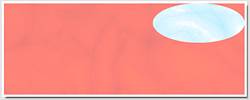
| Fig 84. Horizontal Center, Vertical Center. |
Fig 85. Horizontal Center, Vertical Bottom. |
 |
| Fig 86. Horizontal Right, Vertical Top. |
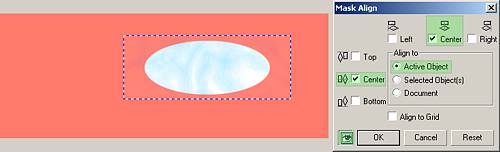
Mask Align: To Active Object.
This option aligns the edges of the mask to the specified edges of the active object. To help show this, I have reduced the size of the active object (Object 2), and turned on the Object Marquee Visibility (CTRL+SHIFT+H) so it is more easily seen. The same mask is used in overlay mode.
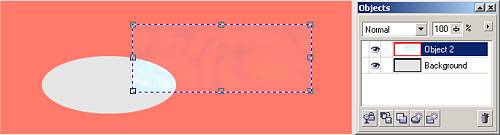 |
| Fig 87. The base configuration of active object and mask before alignment.. |
 |
| Fig 88. To Active Object, Horizontal Center, Vertical Center. |
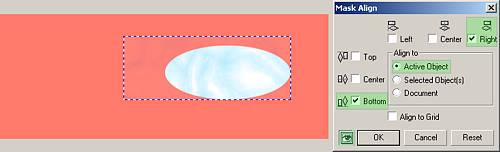 |
| Fig 89. To Active Object, Horizontal Right, Vertical Bottom. |
Mask Align: To Selected objects.
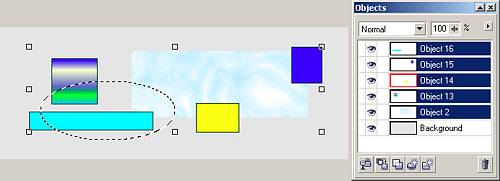
Photo-Paint also allows you to align a mask to the overall boundary any number of selected objects. To demonstrate this I have created a number of additional small objects and selected them all. The mask used is the same as in the previous examples. The objects do no need to be grouped, just selected, and it does not matter which object is the Active object. The mask gets aligned against the summed boundary of all the selected objects together.
 |
| Fig 90. Aligning Masks to Objects. The basic configuration of mask and objects used. |
Fig 90 shows the base configuration consisting of several selected objects and the mask (shown in marquee mode for clarity) in its original position before alignment.
Figs 91 and 92 show two of the many possible arrangments we can choose to align the mask to selected objects.
 |
| Fig 91. Aligning Masks
to Objects. |
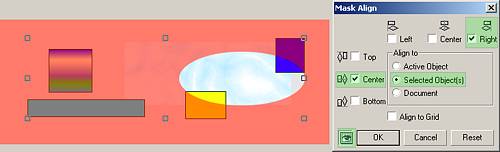 |
| Fig 92. Aligning Masks to Objects. To Selected Objects, Horizontal Right, Vertical Center, Overlay Mode. |
Mask Align: Align To Grid.
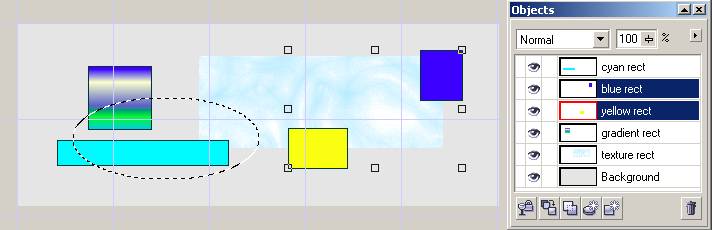
This option in Mask Align is different from that in the Align and Distribute for objects dialogue. For Mask Align, the three other Align To options are NOT disabled when Align to Grid is enabled, as they are in the Align Tab for objects. This means that the resultant position of the mask is dependent on both the grid AND the whichever other option is chosen. Positioning within the grid coordinates does though occur at a higher priority than the other options when Align to Grid is selected. In the following examples the selected objects are the yellow and blue rectangles with the yellow rectangle being the Active object.
 |
| Fig 93. Aligning Masks
to Objects. |
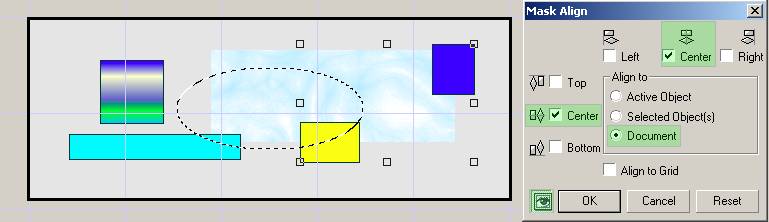 |
| Fig 94. Aligning Masks to Objects. Center to document, no grid involvement. |
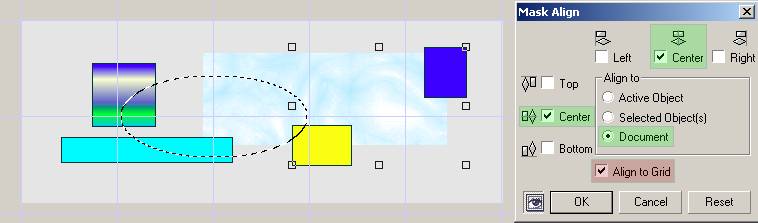 |
| Fig 95. Aligning Masks to Objects. Center to document, with grid involvement. |
 |
| Fig 96. Aligning Masks to Objects. Center to Active object, no grid involvement. |
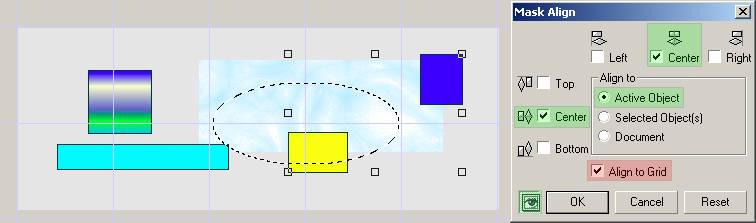 |
| Fig 97. Aligning Masks to Objects. Center to Active object, with grid involvement. |
Of course, this mixed involvement of alignment between the grid and other objects is also true for the Selected Objects option.
*TIP You CAN actually work on more than on mask at a time in Photo-Paint using Paint on Mask mode and in Calculations, and when using Clip Masks and the Channels Docker! But THAT is another epic story (tutorial?) entirely.
| << PREV | tôp | NEXT >> |
![]()
| - More Tutorials - | - Contact Me - | |