 |
A Simple Method to Create Surface-Skewed Shadows
Using Corel Photo-Paint 9 or 10 |
|
|
|
Thanks to Mr Ron Delpino for his question on the Corel Photo-Paint 10 newsgroups and thus the inspiration for this quick and easy tutorial.
"Hello, can someone give me some guidance on below matter......regarding shadow creations in PP or Draw....I had a image of a person standing about 3 feet from a wall. I wanted to create a shadow for the person that would show he was about 3 feet from wall. I created the shadow (Perspective) and clicked "Apply"...It did not look right so I went outside and stood next to a wall and looked at my shadow especially where the shadow on the ground met the wall.....I could see the problem....In real life the shadow seems to "skew"....or angle off slightly when it reaches the wall....To me this means somehow I have to be able to Bend, cut and skew or something like this the shadow in PP or draw to show the change in the shadow when it hits a wall a person is standing near...I am not sure how I could get this type of control in shadow making. How do I bend a shadow in draw/pp since bitmaps are not easy to "node edit" from what I know ?? anyone have any ideas they have found successful....Thanks...Ron"
Thanks Ron, this one's for you.
|
|
The full method below outlines a simple, but complete method to create such shadow objects using Corel Photo-Paint versions 9 and later. There is no direct method using the Shadow Tool alone, so we create 2 shadows, chop each them in half and then skew one of them.
As usual, it takes much, much longer to write down the complete steps than it does to actually do it, so after you have followed the procedure for the first time, it should be quite simple and very quick on subsequent occasions, after you know the basic steps. If you already know Photo-Paint well, you might like to skip straight to the Simplified Instructions located below these detailed ones.
|
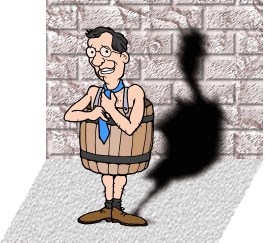
Here is the final image:
 |
| Figure 1: The finished project you'll be creating. |
|
|
THE COMPLETE DETAILED METHOD:
|
|
Step 1: Create a new image in Photo-paint 9 or above.
I used an initial image of 300x300 pixels @ 96 dpi, white background, 24 bit colour depth.
|
|
Step 2: Import an object of a figure with a clear/no background.
I dragged some clipart from Corel Draw straight into the Photo-paint image. If you have both Draw and Paint open together they both appear on the Taskbar. In Corel Draw, drag or CTRL-drag (click-hold first then hold down CTRL in Draw) some clipart down to the Photo-Paint icon on the taskbar until PP opens as the active window. Then just drop the dragged object into either the PP workspace (creates a new image) or onto an existing image (creates a new object). If you would like to use the same vector image I used, right-click HERE  (man_in_a_barrel.cdr - Corel Draw version 9 file, zipped), and save it to your disk, open it in Draw then drag the grouped clipart object into Photo-Paint. (man_in_a_barrel.cdr - Corel Draw version 9 file, zipped), and save it to your disk, open it in Draw then drag the grouped clipart object into Photo-Paint.
|
|
Step 3: Create ground and wall planes.
Create two planes - one ground and one wall. Place the planes under the figure object. In the Object Docker rename them ground and wall.
For the ground rectangle I used a texture fill (Sample, Stucco, shade colour = 20% black), then skewed it. For the wall rectangle I used another texture fill (Styles, Leather2C), then applied a texture (Effects > Texture > Brick Wall). Align and size these objects as shown above.
|
 |
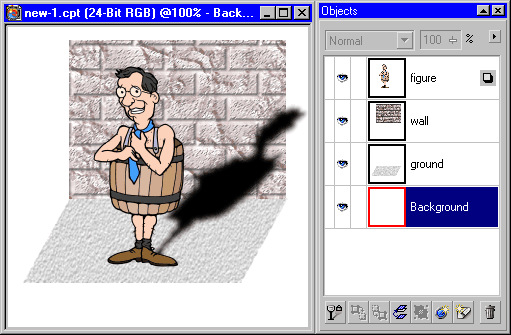
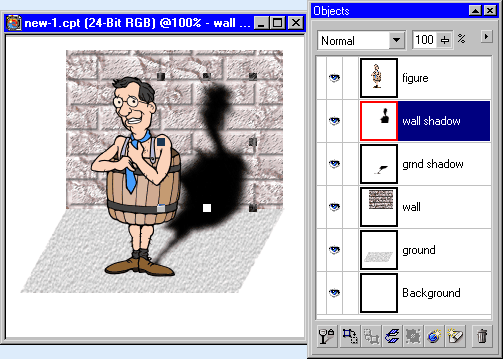
| Figure 2: Adding a perspective shadow to the figure. Object Docker is also shown. |
|
top
|
|
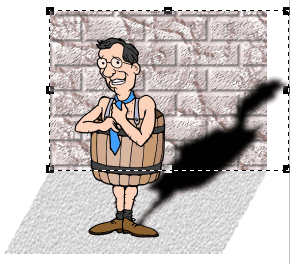
Step 4: Create a perspective drop shadow from the object's feet upwards and to the right. (Fig 2).
Select the figure object then choose the Drop Shadow tool and drag from the middle of the figure's feet up and to the right. In this instance I used the default shadow settings but these could be changed as desired.
|
|
Step 5: Split the shadow from the object.
Using PP version 9 or 10, split the drop shadow from the object.
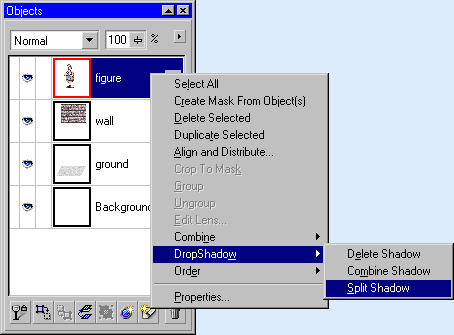
You can do this by right-clicking either the object on the image or the object in the Object Docker (shown in Figure 3) then choosing Drop Shadow > Split shadow.
|
 |
| Figure 3. Splitting the drop shadow from the Object. |
|
|
|
Step 6: Duplicate the shadow object (CTRL-D).
Move the duplicate shadow to ensure that both duplicates are just positioned under the figure object in the Objects Docker.
|
Step 7: Create a mask from the wall object.
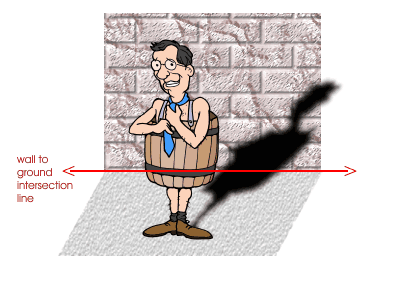
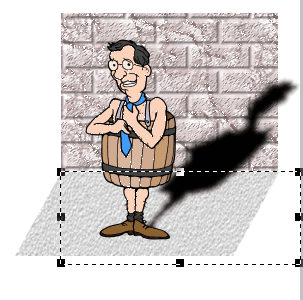
Select the wall object then create a mask from it (CTRL-M or Mask > Create from Object/s). You may need to extend the mask to the right using the Mask transform tool - until the shadow objects fit within it sideways (Figure 4). Don't alter the mask downwards - keep the bottom of the mask at the intersection between the wall and the ground planes (Figure 5). You may need to 'Apply' the mask transformation (double-click inside the mask, or right-click inside it then choose 'Apply') if you've altered it. |
 |
 |
| Figure 4: Create a mask from the wall object |
Figure 5: Keep this intersection point in mind when making any alterations to the mask. |
|
|
Step 8: Crop the upper shadow to the wall mask.
Select the upper shadow object (use the Object Docker) and then crop it to the mask (Object > Crop to mask).
top
|
|
Step 9: Reposition the mask to the ground object then crop the lower shadow object.
Now you need to reposition the mask so that it is flipped vertically about the intersection line. Select the mask with the mask Transform Tool (M) and drag the top middle node of the mask downwards until it reaches past the bottom edge of the ground plane. You actually pass through the previous lower edge of the mask during this, thus flipping the mask about the intersection line shown in Figure 5. Double-click inside the mask to apply the transformation.
Change to the
Object Transform Tool (O), and select the lower shadow object and repeat the Object > Crop to Mask command.
Now you have two cropped shadows - one on the ground and one on the wall. You can delete the mask now that you have cropped both shadow objects.
|
 |
| Figure 6: The mask after dragging it's top middle node downward to below the bottom edge of the ground plane. |
|
|
 |
| Figure 7. Skewing the upper (wall) shadow. |
Step 10. Skew the upper (wall) shadow.
Select the upper (wall) shadow with the Object Picker Tool, then click on it again to change to the Rotate mode (rotate handles appear) (or use the mode list on the far LHS of the Object Property bar). Drag the top centre control handle to the left to skew the top of the wall shadow until it is vertical.
Click on the wall shadow object several times with the Object Picker (Object Transform) tool to reach the rectangular transform mode again (solid block control handles) and then stretch the wall shadow upwards a little by dragging the top centre handle upwards.
You may need to shift the upper shadow slightly until it aligns perfectly with the lower shadow.
That's all! Job complete!
|
|
|
A zipped version of the complete Photo-Paint .CPT file (for versions 9 & 10 only) can be downloaded here (271K).
top
|
|
SIMPLIFIED INSTRUCTIONS:
- Create two planes (ground and wall).
- Create or add an object in front of the planes.
- Create a perspective drop shadow of this object.
- Split the drop shadow from the object then duplicate it.
- Ensure the duplicates are just behind the object (below it in the Objects Docker).
- Create a mask from the wall object then use it to crop the 'wall' part of one of the masks.
- Flip the mask about the ground-wall intersection point then crop the other ('ground') mask
- Remove the mask
- Skew the upper (wall) mask until it is vertical. Reposition as desired.
- David Mutch, 13 June, 2001
top
|
