|
Part 3: |
|
Wing Curvature |
Boomerangs are usually made from a curved piece of wood, such as that found in a bent tree branch. Therefore we need to curve the grain of our wood fill to add some realism.
Mesh Warp.
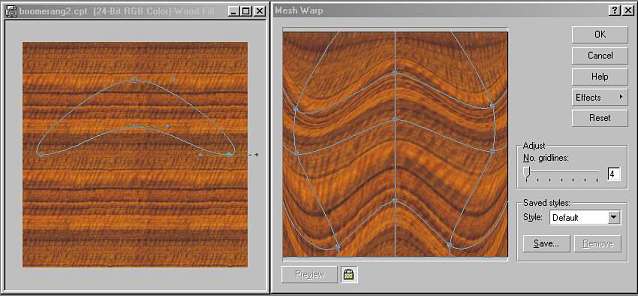
- Minimise the Objects Docker if it is open to make more screen space, then decrease the size of the current image view by dragging a lower right corner up and in and then choose To Fit from the Zoom Dropdown on the Toolbar. Open the Effects/3D Effects/Mesh Warp dialog box and place it beside the image so that both are visible at the same time. My current screen layout is shown in Figure 5.
|
Figure 5. The Image window and Mesh Warp dialogue boxes open side-by-side for better control over the effect. |
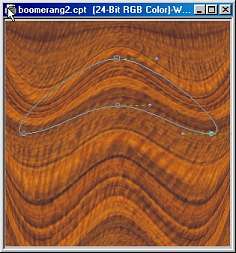
- Move the nodes on the grid of the Mesh Warp dialogue into a position similar to that shown in Figure 5, then click OK. You can always undo it and try again if it doesn't seem right. Notice that we can estimate the correct shape better by leaving the path visible in the image window placed alongside the dialogue window. You should end up with an image similar to Figure 6.
|
Figure 6. The wood tile warped to suit the boomerang path shape. |
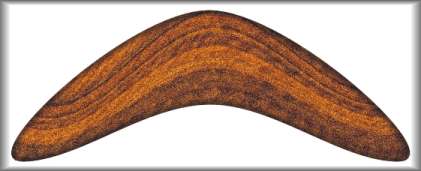
The boomerang takes shape.
- We don't need to see the path any more so choose the Path Edit tool and then the Hide/Show Path icon. However, we do need the mask now. Select the Objects Picker tool again then Mask/Load/boomerang to load the boomerang mask back in again.
- On the ToolBar, click Copy then Paste As Object to copy the masked portion of the wood fill to a new object. Check for it's presence on the Objects Docker. Make sure it is selected, then click the eye icon on the wood fill to hide it and inspect the boomerang by itself. Rename the object `boomerang´.
- At this stage it is probably a good idea to see more of our image so expand the current view and then Zoom to fit (Zoom Dropdown, To Fit).
Adding some realism.
Boomerangs are usually a bit worse for ware after having been thrown all around the place. Lets add some wear-and-tear and some shading.
- Add some roughness.
- From the Effects menu, select Noise/Add Noise. Leave the type as Gaussian, and adjust the sliders to Level 20, Density 40, then click
- Add some round shading.
- Click the Paint Tool and show the Tools Settings Rollup. On the Tool Settings Rollup, select the Airbrush then Medium Cover from the Type dropdown. Make sure that the paint colour is black (click 100% black on the colour pallet with the left mouse button). Also, make sure the boomerang object is selected on the Objects Docker and the Lock Transparency checkbox (this last step is VERY important).
- From the Edit menu select Stroke/Stroke Mask then Middle of Mask Border and click OK. Your image should look like Figure 7. If you have a grey furry border outside the boomerang shape then you have forgotten to select Lock Transparency on the Objects Docker and you will need to undo then redo the effect.
|
Figure 7. The boomerang with shaded edges. |

- Add some hand sanding.
- With the Airbrush tool still selected, choose the Nib Shape shown in Figure 8.
Change the Brush Size to 45 and the Transparency to 25. Stroke the mask with this brush (Edit/Stroke/Stroke Mask/Middle of Mask Border) to achieve an image like that in Figure 9.
- Save you image (with three objects) at this stage.
|
Figure 8. The correct nib shape. |

|
Figure 9. The boomerang with rough sawn edges (looks much more realistic in full size in PHOTO-PAINT ! |