Creating an Eyeball in Corel Photo-Paint.
Here is a reasonably simple method to create a fairly realistic eyeball using Corel Photo-Paint. Although it has been written using Photo-Paint version 12, this tutorial should be able to be undertaken in most previous versions.
This tutorial uses the Repeat Brushstroke command to assist in the creation of the iris/coloured section.
1. Create a new document.
24bit RGB document 500x500 pixels, 96 dpi, white background. (, ![]() , or CTRL+N)
, or CTRL+N)
2. Draw the outer eyeball.
Select the Ellipse Tool (![]() or F7) and change the Paint colour to 100% Black, the Fill colour to white. On the Property bar choose Uniform Fill and a 1 pixel border. Hold down the SHIFT+CTRL keys together and drag from the centre of the document outwards to create a perfect circle about 3/4 the size of the document. A new object is created. Double-click the Object name in the Object Docker and change the name to “Outer”.
or F7) and change the Paint colour to 100% Black, the Fill colour to white. On the Property bar choose Uniform Fill and a 1 pixel border. Hold down the SHIFT+CTRL keys together and drag from the centre of the document outwards to create a perfect circle about 3/4 the size of the document. A new object is created. Double-click the Object name in the Object Docker and change the name to “Outer”.
3. Lock the Outer object’s transparency.
On either the Object Docker or the Mask/Object Toolbar, press the Lock Object icon ![]() or use the keyboard shortcut CTRL+SHIFT+L. Locking the Transparency at this time will assist many of the later steps which also require the object Transparency to be locked. Keep it locked for the entire tutorial.
or use the keyboard shortcut CTRL+SHIFT+L. Locking the Transparency at this time will assist many of the later steps which also require the object Transparency to be locked. Keep it locked for the entire tutorial.
4. Fill the Outer object with a custom radial fountain fill.
From the menu use Edit > Fill (CTRL+Backspace), Select the Fountain Fill Icon ![]() and press Edit to display the Fountain Fill dialogue. Make the following settings in the Foutain Fill dialogue: Type = Radial, Steps = 999, Edge Pad = 10%, Color Blend = Custom, Colour Band Marker positions and colours (position%:colour) = 0:black, 10:black, 30:white, 100:white. Save these settings as a Preset. (I called mine “AAA-eyeball1"). Click OK twice to fill the circle with this fountain fill. (Fig 1)
and press Edit to display the Fountain Fill dialogue. Make the following settings in the Foutain Fill dialogue: Type = Radial, Steps = 999, Edge Pad = 10%, Color Blend = Custom, Colour Band Marker positions and colours (position%:colour) = 0:black, 10:black, 30:white, 100:white. Save these settings as a Preset. (I called mine “AAA-eyeball1"). Click OK twice to fill the circle with this fountain fill. (Fig 1)
TIP! If you need to find out more about creating and saving custom Fountain Fills, please read THIS TIP and then return here.
5. Create the inner circle.
Select the Outer object with the Object Picker tool ![]() , then duplicate it using the keyboard shortcut CTRL+D. Rename this second object “Inner”.
, then duplicate it using the keyboard shortcut CTRL+D. Rename this second object “Inner”.
Change the fill slightly for this Inner object by double-clicking the Fill Tool ![]() to display the Edit Fill and Transparency dialogue. If the Fountain Fill swatch is not selected then select it and press Edit to display the Fountain Fill dialogue again. The previous fill is displayed. Drag the 30% Marker on the colour band to 45%. Save this fill as a preset (I called mine “AAA-eyeball2"). Then press OK twice to fill the Inner object with this fill. The Lock Transparency should still be ON and so only this object is filled.
to display the Edit Fill and Transparency dialogue. If the Fountain Fill swatch is not selected then select it and press Edit to display the Fountain Fill dialogue again. The previous fill is displayed. Drag the 30% Marker on the colour band to 45%. Save this fill as a preset (I called mine “AAA-eyeball2"). Then press OK twice to fill the Inner object with this fill. The Lock Transparency should still be ON and so only this object is filled.
Select the Inner Object with the Object Picker Tool, ![]() hold down the SHIFT key and drag any of the corner object handles towards the centre until the object a little larger than 60% of the size of the Outer object. (Fig 2)
hold down the SHIFT key and drag any of the corner object handles towards the centre until the object a little larger than 60% of the size of the Outer object. (Fig 2)
6. Create the Lens.
Duplicate the Inner object (CTRL+D) and rename it Lens. SHIFT Drag one of it’s corner handles with the Object Picker tool and reduce its size to around 50% of the size of the Inner object.
Fill the Lens object with 100% black by right-clicking on the black swatch on the palette then use the Fill Tool ![]() at Tolerance=100 (Property Bar) to click inside the Lens object.
at Tolerance=100 (Property Bar) to click inside the Lens object.
Now you have three concentric circles. (Fig 3)
7. Create a Lens Highlight.
Right-click on the white colour palette swatch to change the fill colour to white. Choose the Ellipse tool ![]() and change the Property Bar settings to Uniform Fill, Border = 0. Near the upper right of the lens draw a small upright oval.
and change the Property Bar settings to Uniform Fill, Border = 0. Near the upper right of the lens draw a small upright oval.
Another new object is created. Rename this object "Lens highlight" then select it with the Object Picker tool. Click or switch to Rotate mode ![]() and rotate the oval slightly anticlockwise.
and rotate the oval slightly anticlockwise.
Apply a Gaussian blur () with a radius of 2 pixels to the Lens highlight object. (Fig 4)
8. Create the Iris.
Select the Inner object and duplicate it then reposition it so it is immediately above the original inner object in the Objects Docker. Rename this object “Iris”.
Ensure this object is selected, change the Fill colour to white and fill this object with white using the Fill tool as before (Lock Transparency is still ON).
Add noise to the Iris Object using , Type = Uniform, Level = 100, Density = 100, Mode = Random. Press OK to add the Noise. (Fig 5)
9. Create the Iris streaks (Repeat Brushstroke).
The Iris object should be selected.
Choose the Effect Tool ![]() (), change the Property Bar settings to: Smear Effect, Loaded Cover preset. This particular Smear preset is important for the next effect to work correctly.
(), change the Property Bar settings to: Smear Effect, Loaded Cover preset. This particular Smear preset is important for the next effect to work correctly.
Open the Repeat Brushstroke dialogue (v11-12 = ). In the Presets drop down list, choose Color Ring. It is IMPORTANT to use the Color Ring preset here! Click with the pen cursor right in the middle of the circles (the centre of the black Lens). The Noise has now been repeatedly stroked with the Smear tool. If you need to press UNDO then try again. When done, click Close on the Repeat Brushstroke dialogue to close this box.
Change the Merge Mode of the Iris Object to Subtract. This now blends it correctly with the fountain filled object below it. (Fig 6)
10. Centre most objects.
Using the Object Docker, select the Outer object then hold the SHIFT key and click the topmost object (Lens Highlight). Centre them all to the document using the Align command (), choose To Center of Document then press OK to align all these objects to the middle of the document.
Select the Lens Highlight object alone and reposition it appropriately to the upper right of the lens.
11. Lens touch-up.
Select the Lens object then add a drop shadow to it using the Drop Shadoe tool ![]() . Change the Property Bar settings to: Shadow colour = white, Feather Direction = Outside, Feather Edge = Squared, Shadow Feather = 28, Shadow Transparency = 54, Shadow Offset = 0.
. Change the Property Bar settings to: Shadow colour = white, Feather Direction = Outside, Feather Edge = Squared, Shadow Feather = 28, Shadow Transparency = 54, Shadow Offset = 0.
12. Adding Colour.
We can make our eye any colour we choose by adding another layer and setting its merge mode and transparency appropriately.
Select the Inner object and duplicate it. Rename it "Eye Colour" and reposition it directly between the Inner object and the Iris object..
Now lets add some colour. Make sure the Eye Colour object is selected and Lock Transparency is still turned ON.
Due to this particular set up we need to choose fairly dark colours. If you rest your cursor over a colour on the Color Palette the name of the colour will appear in a pop up. Here are a few colours that I found useful: Desert Blue, Forest Green, Walnut, Sea Green, Sky Blue, Brown, Orange!.
RIGHT-click on a colour you like to change the Fill colour, then select the Fill tool ![]() with the Tolerance set to 100 and click inside the region of the Eye Colour circle.
with the Tolerance set to 100 and click inside the region of the Eye Colour circle.
Using the features on the Object Docker, change the EyeColour object’s transparency tp 66% and its merge mode to Hard Light
NOTE!. For some colours you may prefer to use a Multiply or If Darker merge mode - try them, and others too! (Figs 7a- d)
The final state of our Object Docker objects is shown in Figure 8.
OK, That’s our Basic Eye. We can do a few more things to this construct to create different types of eyes as well.
Variants:
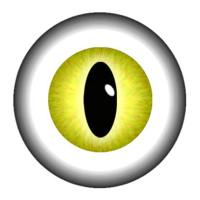
Reptile eyes.
Select the Lens object with the Object Picker Tool and elongate it and make it barrower, Add a soft white drop shadow, Change the Eye Colour to yellow, or green! (Fig 9)
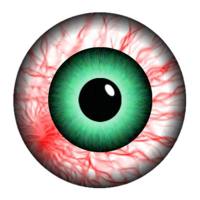
Bloodshot Eyes.
Duplicate the Outer object and reposition it directly above the original, Fill it with White. Change the Paint colour to Red. Choose the Paint tool, Art Brush, Twist preset. Open the Repeat Brushstroke dialogue. Click once in the middle of the circles and once more near the bottom left within the Outer object. Apply a Whirlpool Distortion Effect using the Smudger style. Change the merge mode of this new object to Color. (Fig 10)
Add a few brush strokes and a bit of smear and smudge effect and there’s an eye for you.
You may wish to experiment more with repeat Brushstroke. You can use it with any brush type tool!
April, 2005.