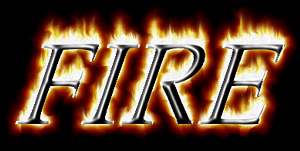
| |

Fig
2 |
3.
Create a mask from the text Object 
Mask
> Create from Object/s or
CTRL+M
4.
Switch to Paint on Mask (POM) mode 
Mask
> Paint on Mask or CTRL+K
|

Fig
3 |
5.
Apply a Gaussian Blur: 
Effects > Blur
> Gaussian
Radius
= 3
|
Fig
4 |
6.
Apply a Wind Effect using the following parameters: 
Effects
> Distort > Wind
Strength = 90,
Opacity = 100,
Angle = 90.
|
Fig
5 |
7.
Repeat the Wind Effect
Changing Angle = 93. |
| 
Fig
6a
 Fig
6b Fig
6b
|
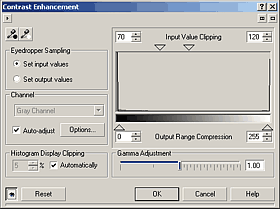
8.
Adjust the Levels of the mask image 
by applying a Contrast Enhancement adjustment
Image > Adjust > Contrast Enhancement
Change the
lower Input Value Clipping marker = 70
and the
upper Input Value Clipping marker = 120
|
Fig
7 |
9.
Return from POM mode
uncheck Mask >
Paint on Mask,
or use the CTRL+K toggle
then save this mask as a channel called
‘base’
Mask > Save >
Save As Channel
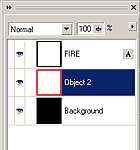
10.
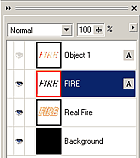
Create a new object 
Object
> Create > New Object, or use the icon on the Object
Docker
then drag the new object below the
text object in the Object Docker.
Make sure this new object is
selected - there should be a red box
around the thumbnail in the Object
Docker.
Rename this object ‘Real
Fire’ by double-clicking
on its name in the Object Docker.
|
Fig
8 |
11.
Feather
the current mask:
Mask
> Mask Outline > Feather (vers 11+)
or
Mask > Shape > Feather (vers
8-10), 
Width = 16,
Direction = Outside,
Edges = Linear.
12.
RIGHT-click on the Red colour swatch in the Palette
to change the FILL colour to
Red.
Click on the Fill Tool 
then left-click inside the mask to fill
it with Red.
|
Fig
10 |
15.
Remove the mask and load the base mask again.
Change the fill colour to white then fill this mask with white
(this time use Edit > Fill and make
sure Current Fill is selected).
Remove
the mask. |
Fig
11 |
16.
Select the text in the Object Docker then double-click on the text
tool to enter text edit mode.
Drag to select all of the text then left-click on the 100% black
colour swatch to change the colour of the text to black.
Select the Object Picker tool 
to apply the change.
|
Fig
12a
Fig
12b |
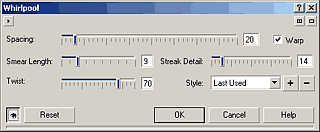
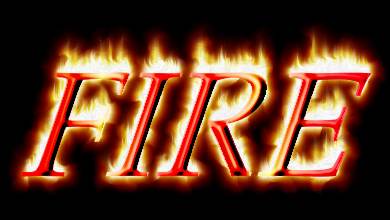
17.
Select
the ‘Real Fire’ object,
then apply a Whirlpool Effect 
Effects
> Distort > Whirlpool
In this dialogue, first:
click the Reset button,
choose the Default Style and
change Streak Detail = 14.
18. Now save
the image as a CPT file so you
can retrieve it later for editing
if you like.
You can also Export it as a
JPG or GIF.
You could also alter it further
as follows:
|
Red
Hot Metal Text:
Fig
13
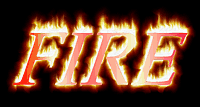
Fig 14
|
1.
Select the text object, and duplicate it (CTRL+D)
2.
With the upper text object selected, Lock the object’s Transparency
(use the ... button either on the Mask/Object Toolbar or on the
Object Docker.
3.
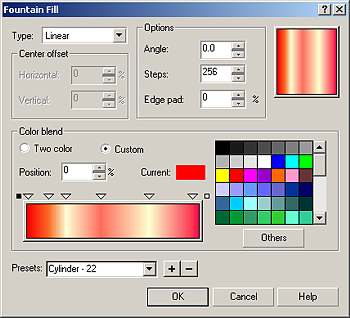
From The Edit menu choose Fill, then click the Fountain Fill icon
and then the Edit button in this dialogue to open the Fountain Fill
dialogue.
From the drop down list of presets, choose ‘Cylinder - 22',
then click OK twice to fill the upper text object with this fill.
|
Fig
15 |
4.
Unlock the Object Transparency 
(this icon is a toggle for this function so just press it again
to turn it off).
Select the lower text object then click the eye icon on the upper
text object to render the upper text object invisible, so you can
see and work with the lower text object.
5.
Create a mask from the lower text object and then invert the mask
.
, 
|
Fig
16a
Fig 16b
|
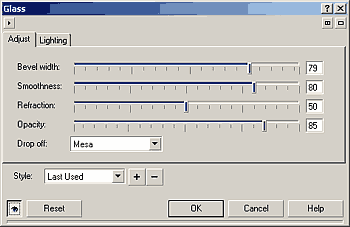
6.
Apply a Glass Effect 
Effects > 3D Effects > Glass
using the settings shown here: |
Fig
17 |
7.
Remove the mask 
to arrive at the image here: |

Fig
18 |
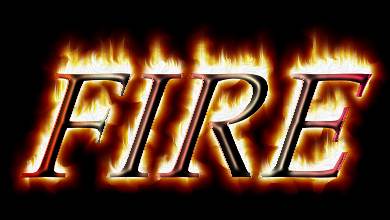
8.
Now select the upper text object
and change its Merge Mode = Hard Light. |
Other
Neat Effects created by adjusting Merge Modes
Fig
19 |
1.
Red Hot Metal #2:
Swap the positions of the two text objects
from Step 8 then change the merge modes so that
the top (darker) object = Color Burn
the lower text object = Normal |
Fig
20 |
2.
Cooling Metal:
Swap the positions of the two text objects
from Step 8, then change the merge modes so that
the top (darker) object = Texturize
and the lower (red gradient) object = Color. |
Fig
21 |
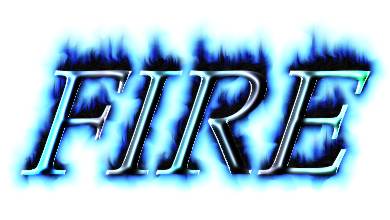
- 3.
Blue Fire:
Create a new object and position it directly above the background
then fill it with white.
Change the merge mode of the Real Fire object (which is directly
above the new white object) to Invert.
The dark text object above this has a merge mode of Normal
while the uppermost (orange gradient) text object has a merge
mode of Divide.
|
|