| Introduction Duotone - The Basics Duotone - Advanced Direct from RGB - HSL - Colour Balance - Selective Color - Color Hue & Tone Using Masks Conclusion |
|
|
|
Using full RGB images gives us much greater scope to manipulate colour changes. There are a great many different ways we can alter colours using either all RGB channels together or separately, by altering aspects of individual colour hues and blends or by selectively changing individual colours or their variants. |
|||||
|
Hue, Saturation, Lightness (HSL). The HSL controls in Photo-Paint allow us to alter either the entire RGB spectrum at once or alter individual channels and channel blends separately. Lets have a look at some of the things we can do using the HSL controls. |
|||||
|
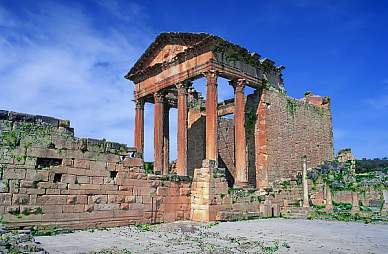
We will use a different starting image for this exercise. I have chosen the 525057.wi image in the Photos/Ancient folder of PP7 disk 2. If you haven't got PP7 you can download a resampled version by clicking the link or the image. I like this image as it has strongly contrasting foreground and background colours and therefore will be fairly easy to perform manipulations on these separate portions. |
|||||
|
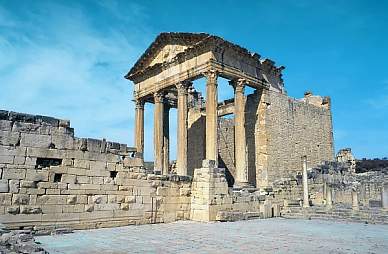
Auto Equalize This photo has been taken in bright sunlight and looks a bit over exposed. We can use Auto Equalize to let PP improve it for us. Auto Equalize will perform a Level Equalization to automatically accentuate or tone down detail in shadow or highlight areas, correct over- or under-exposure, and adjust the tonal range. - Image > Adjust > Auto Equalize. Set a Checkpoint at this point -
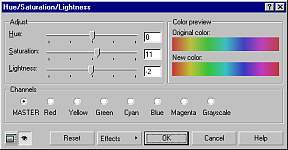
Edit > Undo Special > Checkpoint (PP8) OK, now lets perform some colour manipulations using the HSL controls. - Image > Adjust > Hue, Saturation, Lightness. This brings up the Hue, Saturation,
Lightness dialogue box |
|||||
|
When the HSL dialogue box opens the radio button for channel/blend selection is automatically set to MASTER. Changes to any of the HSL settings while MASTER is selected will alter the entire RGB spectrum within the image.
-
Slide the Saturation (S) slider all the way to the left (-100) to produce
a grayscale image. This is similar to the overexposed image we started with. - Click RESET then slide the H slider to -180 and then to +180. The same result is achieved. We have reached the same point in the colour spectrum from either direction. -
Slide the H slider to -90 to get purple ruins with a green sky. Both of these last two are pretty horrible I must say, but the point is we can reverse or invert the image colours by choosing opposite points of the H slider while in MASTER mode. |
|||||
|
Changing Individual Channels & Channel Blends Lets take a look at changing individual channels and channel blends using the HSL controls. -
Click the RESET button in the HSL dialogue.
-
With the red channel still changed, click on the Green radio button
|
|||||
|
Lets try to keep the ruins as they are but change the sky background only. There are some small quantities of the sky colours we need to change within the ruins but changes to the ruins can be reduced.
-
Restore your image to the Checkpoint we saved To see the differences you may wish to press Undo and then Redo several times to compare the changes. There is very little magenta in this image but you can see it if you select magenta and slide the L control fully left then right. We can use the same method to change both the foreground and the background simultaneously providing we start with an image with quite different fore/back characteristics. |
|||||
|
To make the Sky green and the ruins reddish use the following settings then click OK. (The following values are H, S, L respectively for each colour selected): -
MASTER (RGB):no change; If you make an error, press
Reset in the HSL dialogue box to set all the values back to 0,0,0.
|
|||||
|
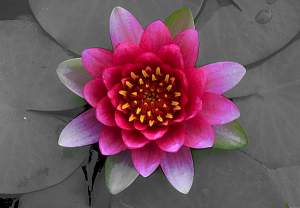
The HSL slider controls can also be used effectively to eliminate background colours and produce a grayscale image with a coloured central object, providing you have a good starting image. The image should possess a good contrast of colours between the foreground object and the background. For this exercise I have provided an image of a colourful flower with green leaves as the background. Click HERE or on the image to down load it. . To eliminate the background colours and render them as grayscale:
You should get an image that looks like this: |
|||||
In the next section we will look at using the Colour Balance controls with RGB images. |
 |
 |
 |
||||
| Copyright
©, 1999. David Mutch Ph.D. and Visionary Voyager Corporation. All rights reserved. |
||||||
 General
HSL controls
General
HSL controls
 Changing
Only the Background
Changing
Only the Background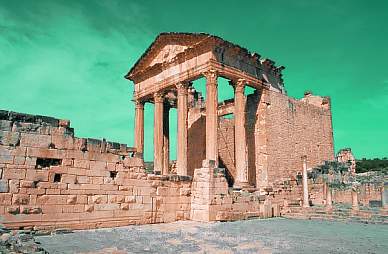 Green
Sky - HSL method
Green
Sky - HSL method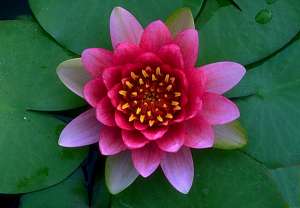
 -
Open the image and then
-
Open the image and then