Blend Settings in Detail.
Lets take a closer look at how the Object Blending in PP9 works.
The concept of blending the
active object with the underlying objects depends on the colours within
the objects. To demonstrate Object Blends as clearly as possible,
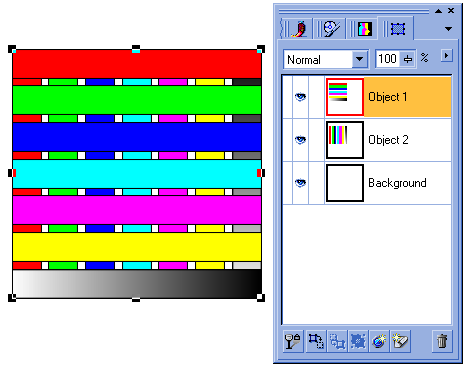
I have constructed a simple set of coloured bars for Red (255,0,0),
Green (0,255,0), Blue (0,0,255), Cyan (0,255,255), Magenta (255,0,255),
Yellow (255,255,0) and a grayscale blend from 0-255. All of these
bar objects were spaced out evenly then combined. A duplicate was made,
rotated 90 degrees clockwise and placed on top of the original (Figure
13). The upper object contains the horizontal bars and is
always selected as the Active Object in the following examples.
The lower object contains the vertical bars and will always be used
as the Composite Underlying in the following examples.
This then allows for the
examination of blend interactions between all the major colours. You
will probably think that these simple bars are quite boring and I do
agree. However these simple objects with basic colours should help demonstrate
these quite complex effects adequately.
 |
|
Figure
13. The two objects used for most of the examples in the Object
Blends section of this review. The upper object with the horizontal
bars is always used as the Active Object here, while the lower
object with vertical bars is always used as the Underlying Composite.
|
Let's start with the full
RGB Channel adjustments.
RGB Channel: Decreasing Maximum and Minimum blends.
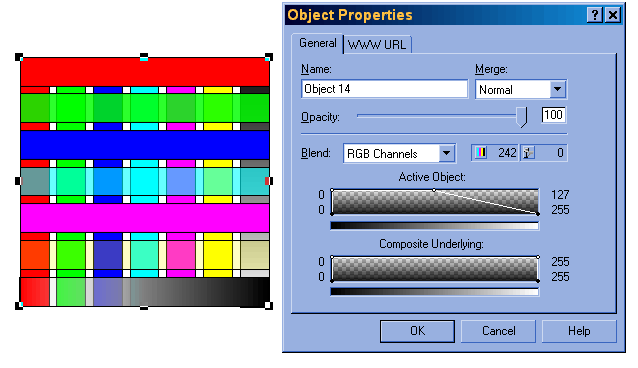
In Figure 14 (below) I have moved
the Decreasing Maximum (top right) node of the active object halfway
down the scale (126 from 255). Note that the changes have only occurred
in the top object. All colours which are considered as lighter in the
grayscale representation (yellows and cyans) have been rendered transparent
to various degrees and the underlying object shows through. The lighter
regions of the grayscale bar are also affected.
 |
|
Figure
14. Decreasing Maximum blend of the Active Object using the combined
RGB channels.
|
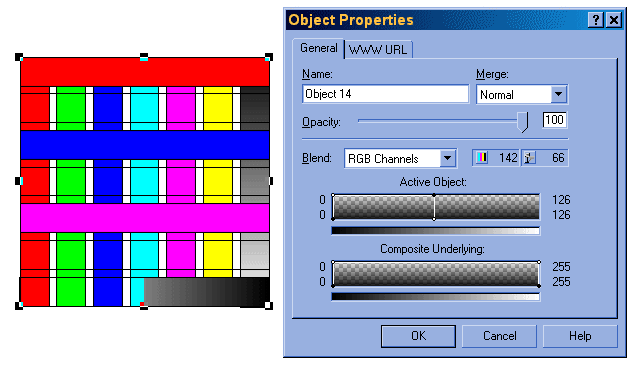
In the next example (Figure
15, below), I have adjusted the Decreasing Minimum node (bottom
right) to the same value as the Decreasing Maximum node (top right).
This causes a sharp cut-off to occur rather than a gradual decrease.
Note that all of the yellow, cyan and green bars are now completely
transparent. The grayscale bar is also cutoff sharply at a precise point.
 |
|
Figure
15. Decreasing Minimum and Decreasing Maximum nodes set to the
same point to cause a sharp cut-off of lighter colours in the
Active Object blend.
|
RGB Channel: Increasing Maximum and Minimum Blends.
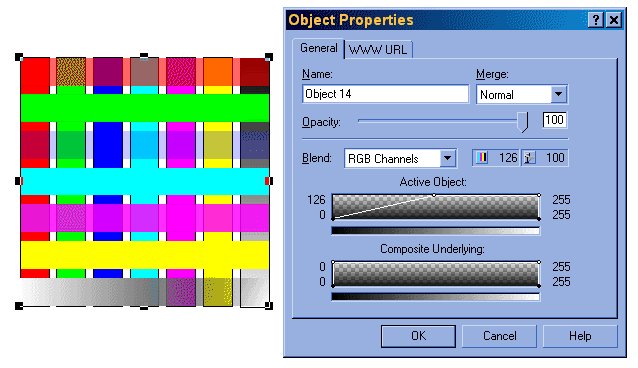
Adjusting the top left node on the active object affects the Increasing
Maximum settings. In the image below (Figure
16) the active object has first been reset and then the Increasing
Maximum node moved from 0 to 126 (half way). All of the darker regions
and colours are affected. The black borders around each box disappeared
first, followed by graduations of the darker colours starting with blue
and then red. The lower end of the grayscale bar is also affected. Note
that we have only been adjusting the Actice Object settings and so far
no changes have occurred in repect of the Underlying Composite Object/s.
 |
|
Figure
16. Effect of Increasing Maximum node change to the Active Object
using all RGB channels.
|
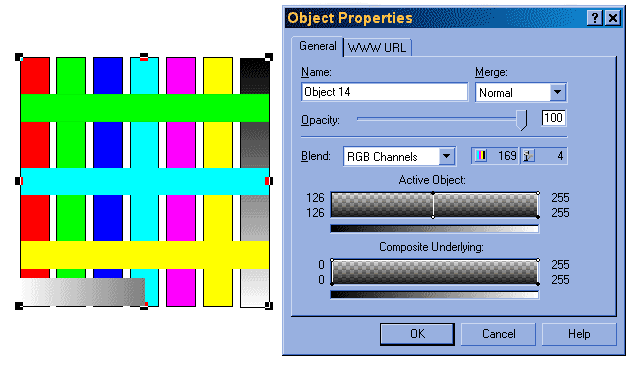
In the next example (Figure
17) the Increasing Minimum node (bottom left) has been dragged
to the same value (126) as the Increasing Maximum node to cause a sharp
cutoff point but this time at the lower (grayscale) colour ranges. Note
that all of the 'darker' colours have now become completely transparent
and the grayscale bar is cutoff midway.
 |
|
Figure
17. Increasing Maximum and Increasing Minimum nodes set to the
same value to cause a sharp cutoff of darker colour opacity in
the Active object using all RGB channels.
|
RGB Channel: Full Increasing and Decreasing Maximums.
In Figures 18 and 19 below, the
Decreasing Maximum and Decreasing Minimum Nodes have been dragged to
cover the complete grayscale spectrum. All colours are now affected
to some degree but this depends on which node we have altered. The Increasing
Maximum (Figure 18) has decreased
the opacity of the darker colours, while the Decreasing Maximum (Figure
19) has decreased the opacity of the lighter colours.
Cross-over Blends and Removing Specific Colours.
The nodes in
both ends of the blend can actually overlap and even cross over each
other. Try dragging the Maximum Decreasing (top right) node of the Active
Object down to a value of about 10, and then drag the Maximum Increasing
(top left) node over the top of this node and past it to a valure of
about 245. In fact, by dragging the Minimum nodes as well, one can exclude
centre regions of the graph, not just the outer (darker and lighter)
regions. By doing this, one can effectively cause the upper and lower
regions to be seen but remove the colours represented in the middle
of the grayscale graph.
 |
|
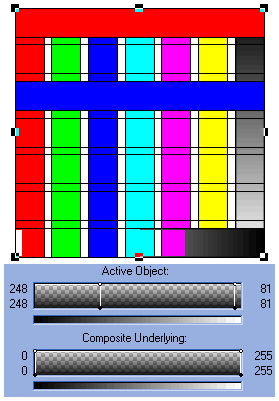
Figure
20. Completely crossed over RGB blend settings which allow the
colurs represented by the middle of the grayscale blend to be
rendered transparent.
|
In the example to the right
(Figure 20), the blend setting of
the Active Object have been created by crossing the Increasing and Decreasing
nodes completely over. Note the values on both sides of the Active Object
graph. The Increasing Maximum node (originally top left) was dragged
all the way accross to a value of 248. The Decreasing Maximum node (originally
top right) was dragged all the way down to 81. The corresponding Minimum
nodes for both sides were then dragged to be directly under their Maximum
counterparts causing a very sharp cutoff in transparency at that point.
Now only the very light (white)
sections and the relativey dark (blue and red) colours in the Active
object are opaque while all the other colours are transparent.
 |
|
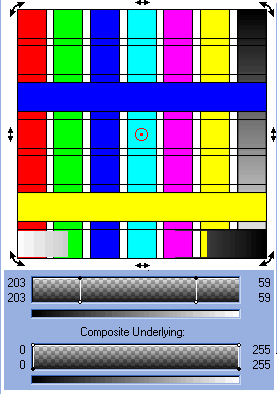
Figure
21. Cross over RGB blend used to display only blue and yellow
colours of the Active Object.
|
In a similar fashion but
using different settings, Figure 21
shows how to display only the blue (dark grayscale) and the yellow and
white (light grayscale) colours to appear in the Active Object.
 |
|
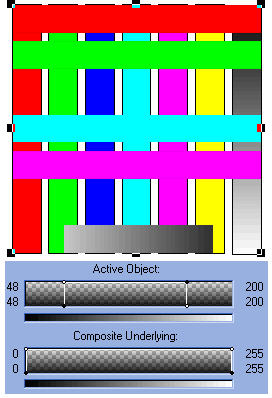
Figure
22. Using similar values to before but not crossed over now displays
only colours represented by the middle of the grayscale blend.
|
Setting similar values but
without crossing the nodes over now causes colours represented by the
central grayscale areas only to be seen, while the lower and upper regions
are completely transparent (Figure 22).
Note the values on each
side of the Active Object blend and how they differ from those in the
examples just above.
Continue
to Page 3 of the Object Blends section
