
Copyright © 2001, David Mutch & Visionary Voyager Corp. P/L
| SIMPLE TEXT EFFECTS TUTORIAL #1 |
 |
| <-prev | INTRO | PART 1A | PART 1B | PART 2 | PART 3 | PART 4 | PART 5 | CLOSE | next-> Copyright © 2001, David Mutch & Visionary Voyager Corp. P/L |
This part of the tutorial shows how to make soft embossed text or objects using separate objects and employing Photo-Paint's Clip Object function.The result can be very similar to that achieved in Part 1A but in this method you have much more control over the positioning of the shaded and highlight regions of the effect because you can move the separate objects!Steps: |
|
1-4 . Repeat steps 1-4 from Part 1A then return here.
|
|
5. Create 2 new objects.
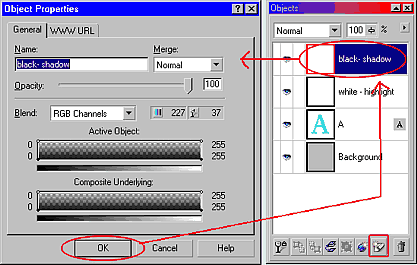
6. Change the names of the new objects. Change the name for the first new object to "white" then click OK. Double-click the second new object and change its name to "black" as shown. |
 |
|
7. Create a mask from the ‘A' object.
|
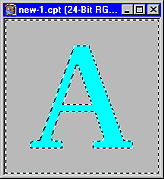 The mask shown here is inverted (step 8). |
|
8. Invert the mask. Mask > Invert, CTRL+SHIFT+I, or press the Now we need to fill shaped areas in the two new (white and black) objects we created in step 5. The filled shapes will be the inverse of the ‘A' character. |
|
|
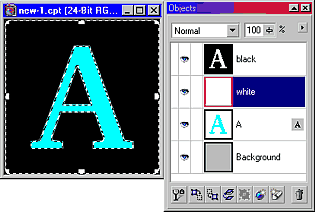
9. Fill the white object with white using the inverted mask shape. From the menu choose Edit > Fill. The Edit Fill and Transparency dialogue opens. Ensure the ‘Current Fill' radio button is selected and that the fill type is ‘Uniform Fill' ( the red, green and blue icon near the eyedropper).
If the colour in the large colour swatch in this dialogue is not white, we need to change it to white. Click the EDIT button. The Uniform Fill dialogue opens. Drag the tiny square in the large gradient colour box right up to the far top left until the readings in the R,G and B value boxes read 255 each. This is pure white (RGB mode). Click OK and then OK again in the Edit Fill and Transparency dialogue. The ‘white - highlight object now contains a white ‘A'. Even though you can't see it in the Objects Docker, your image should now show a white ‘A'. |
|
|
10. Fill the black object with black using the inverted mask shape. After pressing OK twice you should see a black ‘A' in both your image and in the ‘black' object in the Objects Docker. |
 |
|
11. Remove the mask ( Mask > Remove, CTRL+SHIFT+R , or click the |
|
|
12. Blur both the white and black objects. |
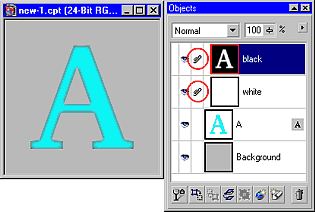
| 13. Clip the black and white objects to the original cyan ‘A' object. This is a really neat feature in Corel Photo-Paint - the ability to ‘clip' one object to another. In the Objects Docker click the blank column between the object thumbnail and the ‘eye' icon for each of the black and white objects. A small paper clip appears beside the thumbnail for each of these two objects. |
 |
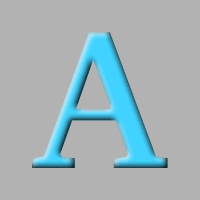
| 14. Shift the position of the clipped objects. Make sure the Object Picker Tool is selected. Select the ‘black' object in the Objects Docker. Using your keyboard arrow keys, move the black object two pixels up and two pixels left (click twice up and twice left). Select the ‘white' object and shift it 2 pixels down and two pixels right (the opposite to how you moved the black object. You image should now look like this: |
 |
 |
Try changing the placement of the white and black objects the other way around - the soft embossed effect appears reversed. You could consider this to be similar to changing the position of a light pointed at the object. |
 |
 |
 |
|
The different effects shown above are achieved by positioning the shadow and highlight objects differently against the original.
|
||
|
In this case the positions of the highlight and shadow objects have been reversed. |
||
Some alternative methods you can try:To help you appreciate the versatility of Photo-Paint, here are some alternative methods to achieve the same result -
|
|
Notes: When a new blank object is created it actually covers the entire area of the image but has no fill applied to it. The 3 alternative methods rely on pre-filling this area with a colour prior to cutting the shape with the mask. The original method uses the Invert Mask function and then fills this inverted, empty area of the newly created ‘blank' objects. In the first alternative method, double-clicking the eraser tool deletes the area inside the mask. In the second alternative method, pressing the DEL key does the same job as the eraser tool. This method relies on the selection of a Mask tool before use. If any other tool is selected, pressing the DEL key simply deletes the mask itself and not the masked area of the object. The third alternative method is similar to the second , but it doesn't matter which tool is currently selected. However, using the Windows CUT function also removes the mask!. Thus the requirement to save it first, or else you will need to recreate it from the original object. |
|
<-prev | INTRO | PART 1A | PART 1B | PART 2 | PART 3 | PART 4 | PART 5 | CLOSE | next->
Copyright © 2001, David Mutch & Visionary Voyager Corp. P/L |
||||