| |
|
| |
|
|
|
| |
 |
|
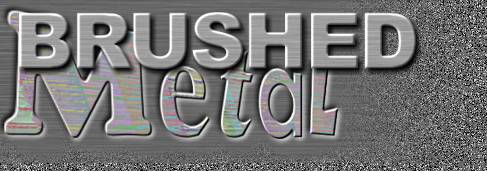
Here's a nice easy one to start with - creating brushed metal text in Corel Photo-Paint. Although this tutorial was written using version 10, users of previous versions should still be able to follow the steps with minor modifications. You can apply this effect to any object you like but since we are dealing with text effects here, we will create the effect on text.
This tutorial describes 2 different methods. The first method applies the effect directly onto text while the second applies it to an entire layer from which the text is cut.
Method 1 | Method 2
|
|
|
| |
|
|
Method 1: Direct on Text.
This method produces some artefacts according to the shape of the text.

|
|
|
| |
|
|
 Create a new image. Create a new image.
RGB, 24-bit image 400x400 pixels, 72 dpi, with a white background.
|
|
|
| |
|
|
 Change your Paint colour to 60% black. Change your Paint colour to 60% black.
Left-click the 60% black swatch on the Palette.
|
|
|
| |
|
|
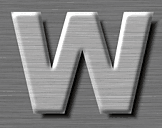
 Create some text and centre it to the image. Create some text and centre it to the image.
Click the Text tool and Type a character or text in a wide san-serif font. I've used Arial Black, 200 points.
Click the Object Picker tool  to 'apply' the text. to 'apply' the text.
Centre the text by choosing Object > Arrange > Align and Distribute then click 'To centre of Document' on the Align tab then press OK.
|
|
|
| |
|
|
 Add some Noise. Add some Noise.
Choose Effects > Noise > Add Noise. Change the settings to:
Noise Type = Uniform,
Level = 100,
Density = 50,
Color Mode = Intensity.
Press OK.
|
 |
 |
|
|
| |
|
|
 Lock the Transparency. Lock the Transparency.
Click the Lock Transparency icon  on the Object Docker or the Mask/Object Toolbar. on the Object Docker or the Mask/Object Toolbar.
Top
|
|
|
| |
|
|
 Motion-blur the noise. Motion-blur the noise.
Choose Effects > Blur > Motion Blur. Click the Reset button
then change the Distance to 75 pixels.
Click OK.
Note the motion blur artefacts from the corners of the letter->
|
 |
|
|
| |
|
|
 Unlock the Transparency and fill the background with 20% black. Unlock the Transparency and fill the background with 20% black.
Click the icon to Unlock the Transparency.
Right-click the 20% black colour swatch.
Click on the background in your image.
Select the Fill (bucket) tool  and click on the background to fill it with the colour. and click on the background to fill it with the colour.
Select the Object Picker Tool ready for the next step.
Top
|
|
|
| |
|
|
 Save a Checkpoint. Save a Checkpoint.
This step is used so you can try out the different edging processes in the next step.
Save a checkpoint using either File > Checkpoint, or open the Undo Docker (Window > Dockers > Undo, or ALT+F9), then click the Checkpoint  icon on the bottom of this docker. icon on the bottom of this docker.
After trying each step below, restore the image back to the checkpoint (Edit > Restore to Checkpoint, or click the  icon on the bottom of the Undo Docker). icon on the bottom of the Undo Docker).
|
|
|
| |
|
|
 Create an Edge to the Lettering. Create an Edge to the Lettering.
This can be achieved in a number of different ways. Here are some ideas: (Restore back to checkpoint if necessary after each procedure to try them out).
|
|
|
| |
|
|
a). Simple Emboss:
- Select the text.
- Use Effects > 3D Effects > Emboss.
- Try different settings.
Start with Depth:5, Level:100, Direction:135, Original Color.
- Add a drop shadow.
|
b). Bossed Text:
- Select the Text.
- Create a mask from the text ( CTRL+M),
- Invert the mask (SHIFT+CTRL+I)
- Apply The Boss Effect (Effects > 3D Effects > The Boss) with the following settings - Width:6, Height:34, Smoothness:25, Drop-Off: Flat, Invert:off, Brightness:90, Sharpness:90, Direction:135, Angle:45.
-
Remove the mask (SHIFT+CTRL+R).
-
Add a drop shadow.
|
c). Soft Emboss:
- Make sure the Lock Transparency is off to start with. - Select the text.
-
Emboss the text (D:5, L:100, 135 degrees, original Color).
-
Create a mask from the text.
-
Reduce the mask by 4 pixels.
-
Feather the mask (6 pixels, inside, linear).
-
Invert the mask.
-
Lock the Transparency.
-
Apply Gaussian Blur (radius=3)
-
Unlock the Transparency.
-
Remove the mask.
-
Add a drop shadow.
|
 |
 |
 |
|
|
|
| |
|
|
|
| |
|
|
Method 2: Cut from a Sheet.
This method produces a smoother effect with no artefacts
|
Top |
|
|
| |
|
|
Create a new image:
RGB, 24-bit image 400x400 pixels, 72 dpi, with a white background.
|
|
|
| |
|
|
Change your Paint colour to 60% black.
Left-click the 60% black swatch on the Palette.
|
|
|
| |
|
|
Create a new object and fill it with the Fill colour.
Object > Create > New Object or use the icon on the Object Docker.
Select the Fill (bucket) tool and click on the image.
|
|
|
| |
|
|
Add some Noise.
Choose Effects > Noise > Add Noise. Change the settings to:
Noise Type = Uniform,
Level = 100,
Density = 50,
Color Mode = Intensity.
Press OK.
|
 |
|
|
| |
|
|
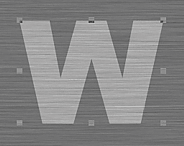
Motion-blur the noise.
Choose Effects > Blur > Motion Blur. Click the Reset button
then change the Distance to 75 pixels.
Click OK.
|
 |
| |
Top |
|
|
| |
|
|
Create a text mask.
Click the Text tool and change the settings on the Property bar first. I've used Arial Black, 200 points.
Make sure the Render To Mask Option is turned ON (button depressed).
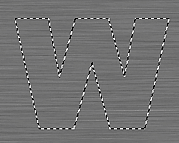
Type a character or text near the centre of your image.
Click the Object Picker tool to 'apply' the text MASK.
Select the Mask Transform Tool (icon or use the keyboard shortcut 'M').
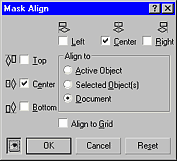
Centre the text MASK by choosing Mask > Align then click To Center of Document on the Align tab then press OK.
|
|
|
|
| |
|
|
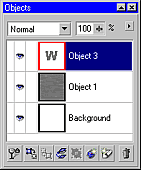
Cut a new object using the mask.
Object > Create > Object: Copy Selection, CTRL+UpArrow
or use the  icon on the Mask/Objects Toolbar. icon on the Mask/Objects Toolbar.
A new object the shape of your text appears in the Objects Docker.
|
 |
|
|
| |
|
|
Adjust the BCI of the object.
Image > Adjust > Brightness-Contrast-Intensity.
Change the settings to B=25, C=25, I=0 then press OK.
|
 |
|
|
| |
|
|
|
| |
|
|
|
| |
|
|
|
| |
|