| |
|
| |
|
|
Introduction: This section describes how to make realistic chrome-like text in Corel Photo-Paint versions 8+ (some slight differences in the procedure described here occur in version 8). You can use the same procedure for objects too. The effect relies on a Difference merge mode and the use of the Tone Curve.
Main Method | Variations | Examples
|
|
|
| |
|
|

 Create a new image. Create a new image.
File > New, or use the  icon . icon .
Set the 24-bit RGB, white background, units = pixels, 500 W x 200 H, resolution 72 dpi.
|
|
|
| |
|
|
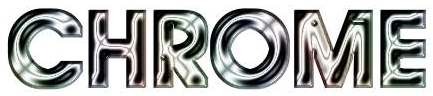
 Create the text 'CHROME' in a medium, rounded font and centre it to the image. Create the text 'CHROME' in a medium, rounded font and centre it to the image.
Select the Text Tool  , Change the settings on the Property Bar, click inside your image, then type your text. , Change the settings on the Property Bar, click inside your image, then type your text.
I used AvantGarde Md BT at 96 pts in 100% Black with a character spacing of 20.
Centre the text to the image. (Object > Arrange > Align and Distribute or  , then To Center of Document, press OK. , then To Center of Document, press OK.
Note: Use of very thick/bold fonts for the text will cause the characters to appear to be joined together.
You may need to increase the character spacing more in such cases.
|
 |
|
|
| |
|
|
 Create a mask of the text object. Create a mask of the text object.
To create the mask, use either Mask > Create from Objects, CTRL+M or the  icon on the Mask/Object Toolbar. icon on the Mask/Object Toolbar.
You can visualise the mask's marquee (Mask > Marquee Visible, or the  icon on the Mask/Object Toolbar). icon on the Mask/Object Toolbar).
Also, you can see the current mask as a channel in the Channels Docker (CTRL+F9) called 'Current Mask'.
|
 |
|
|
| |
|
|
 Save the mask as a Channel. Save the mask as a Channel.
Mask > Save > Save As Channel,
type in the name "Chrome Mask", then press OK.
Note: A new channel called 'Chrome Mask' will appear in the Channels Docker, along with the Current Mask channel.
|
 |
|
|
| |
|
|
 Remove the mask. Remove the mask.
Mask > Remove, SHIFT+CTRL+R, or use the  icon on the Mask/Object Toolbar. icon on the Mask/Object Toolbar.
Note: The Current Mask channel disappears from the Channels Docker.
top
|
|
|
| |
|
|
 Combine the text object with the background. Combine the text object with the background.
Use either Object > Combine > Objects with Background, or CTRL+DnArrow.
|
|
|
| |
|
|
 Blur the image. Blur the image.
Effects > Blur > Gaussian Blur.
Use a setting of 4 pixels then press OK.
|
 |
|
|
| |
|
|
 Create a copy of the background using a mask. Create a copy of the background using a mask.
Create a mask of the entire image (Mask > Select All or SHIFT+CTRL+A).
Create a new object from the masked area of the background : Object > Create > Object: Copy Selection, or CTRL+UpArrow, or use the  icon on the Mask/Object Toolbar. icon on the Mask/Object Toolbar.
|
|
|
| |
|
|
 Change the Merge Mode of the floating object. Change the Merge Mode of the floating object.
The object above the background should be selected. If not, select it in the Objects Docker.
Display the options in the Merge Mode drop down by clicking the arrow near the list and choose Difference.
The entire image should go black.
Don't worry, everything is still there. As the floating object and the background are currently identical, there is NO difference between them - therefore the overall full black appearance.
|
|
|
| |
|
|
 Reposition the floating object using the Offset filter. Reposition the floating object using the Offset filter.
From the Effects menu choose Distort > Offset (PP8 users choose 2D Effects > Offset), change both the Horizontal and Vertical sliders to -4, Undefined Area = Wrap Around and make sure the 'Shift values as % of dimensions' checkbox is UNchecked, then press OK.
|
 |
|
|
| |
|
|
 Combine the floating object with the background. Combine the floating object with the background.
Objects > Combine > Objects with Background, or CTRL+DnArrow
top
|
|
|
| |
|
|
 Invert the image. Invert the image.
Image > Transform > Invert.
|
 |
|
|
| |
|
|
 Auto Equalize the image. Auto Equalize the image.
Image > Adjust > Auto Equalize.
The Auto Equalize adjustment performs a flat equalization on your image by automatically redistributing the significant pixel values of your image through the tonal range.
|
 |
|
|
| |
|
|
 Adjust the Tone Curve of the image. Adjust the Tone Curve of the image.
From the menu, choose Image > Adjust > Tone Curve, or use the keyboard shortcut CTRL+T. The Tone Curve dialogue opens.
The Tone Curve filter lets you perform colour and tonal corrections by adjusting pixel values plotted along a response curve that appears in a graph. The response curve represents the balance between shadows, midtones, and highlights. You can modify the response curve by adding nodes for curved or straight lines, drawing freehand, or using a gamma curve. Customized Tone Curves can be saved for later use.
The curve we want to make is shown opposite. To make it easier, load a preset curve first. Click the Open Folder icon (near the disk(save) icon). This should open and display *.crv files in the Tonecrve folder (if not navigate to ...GraphicsX\Custom\Tonecrve - where X = your version of PP (e.g. Graphics9 or Graphics10 etc.)). Choose and open the solarize.crv file. The solarize curve appears in the graph.
|
|
|
Move your mouse cursor over one of the nodes on the curve. The cursor changes (a hand in version 8 and a crosshair in versions 9 and 10). Once the cursor changes you can click and drag to reposition the node. If you click elsewhere on the curve you will create an extra node. If you click elsewhere in the graph you will add an extra node AND completely shift the curve. If you mess up, just reload the solarize tone curve.
|
|
When you have succeeded in changing it so it appears as shown here, save the curve (press the disk icon) as chrome.crv for later use.
If you would
like to use the Tone Curve I used myself you can download it here
(chrome_tonecurve.zip)
The resultant image should look like this:
|
 |
|
|
| |
|
|
 Load the saved mask. Load the saved mask.
Remember the mask we created and saved at the beginning of this tutorial? We need to use it now.
So from the menu choose Mask > Load > Chrome Mask (choose it from the list).
If the Mask Marquee Visible switch is on you will see the mask marquee.
|
 |
|
|
| |
|
|
 Expand the mask. Expand the mask.
The altered text is now quite a lot bigger than the original, so we need to expand the size of the mask a little.
Choose Mask
> Shape > Expand (vers 8-10) or
Mask > Mask Outline > Expand (versions
11+). Change the
Width to 5 pixels then press OK.
|
 |
|
|
| |
|
|
 Invert the mask then apply The Boss Effect to the image. Invert the mask then apply The Boss Effect to the image.
Choose Mask > Invert, SHIFT+CTRL+I, or use the  icon on the Mask/Object Toolbar to invert the mask. icon on the Mask/Object Toolbar to invert the mask.
Choose Effects > 3D Effects > The Boss to open the Boss Effect dialogue.
Click the Reset button (or choose Default from the presets drop down) and change the width to 3 pixels, then press OK. (Make sure the invert checkbox is NOT checked).
|
(mask removed for clarity here)
|
|
|
| |
|
|
 Create an object using the mask. Create an object using the mask.
Invert the mask (Mask > Invert, SHIFT+CTRL+I, or the icon).
Now cut the contents of the mask into a new object (Object > Create > Object:Cut Selection, SHIFT+CTRL+UpArrow
or use the  icon on the Mask/Object Toolbar. icon on the Mask/Object Toolbar.
A new object appears in the Objects Docker.
Top
|
|
|
|
| |
|
|
 Clear the background. Clear the background.
Select the background object in the Objects Docker then use Edit > Clear (or double-click the Eraser tool) to clear it.
|
 |
|
|
| |
|
|
 Duplicate the floating object. Duplicate the floating object.
Select the floating object in the Object Docker.
Duplicate it (CTRL+D, or Object > Duplicate).
The duplicated (upper) object should now be selected in the Objects Docker.
|
|
|
| |
|
|
 Add a little reflective coloration. Add a little reflective coloration.
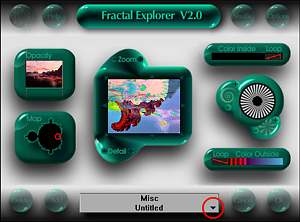
Apply a colour effect using the Julia Set Explorer:
From the menu choose Effects > Fancy > Julia Set Explorer.
The Julia Set Explorer dialogue appears.
 Click and hold on the small black triangle in the preset types list near the bottom middle of the dialogue. While continuously pressing on your mouse button, roll over the Corel Presets type so the complete list of Corel Presets appears. Choose 60's Wallpaper (at the top of the list) then release the mouse button. The preview and settings in the dialogue change. Click and hold on the small black triangle in the preset types list near the bottom middle of the dialogue. While continuously pressing on your mouse button, roll over the Corel Presets type so the complete list of Corel Presets appears. Choose 60's Wallpaper (at the top of the list) then release the mouse button. The preview and settings in the dialogue change.
|
 |
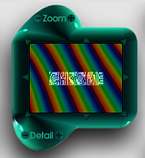
| Press the OK button. Your image should now look like this: |
 |
|
|
| |
|
|
 Adjust the merge mode and opacity of the upper object. Adjust the merge mode and opacity of the upper object.
With the upper object still selected, change its merge mode to Soft Light and the opacity to about 40-50%.
That's it!
top
|
|
|
| |
|