| |
|
|
Here is a nice technique to make realistic gold. This technique is probably best used for text or things like rings where the gold finish is much more polished than in gold nuggets etc. You can use this technique in all versions of Corel Photo-Paint from version 8 upwards.
Steps:
|
|
|
| |
|
|
 Create a new image: Create a new image:  , 600 x 200 pixels, 72 dpi, white background. , 600 x 200 pixels, 72 dpi, white background.
|
|
|
| |
|
|
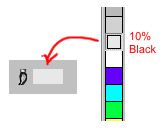
 Change the Paint colour to 10% black. Change the Paint colour to 10% black.
Left-click the 10% Black colour swatch in the palette.
The Paint Colour swatch in the status bar changes to 10% black.
|
 |
|
|
| |
|
|
 Create and Centre the text. Create and Centre the text.
Click the text tool. Change the Property bar settings to:
Font: BankGothic Md BT, Size: 160 points
Click near the top centre of your image and type ‘GOLD', then click the Object Picker tool  to render the text. to render the text.
Use Object > Arrange > Align and Distribute , choose 'To Center of Document' then press OK to centre the text to the image.
|
 |
|
|
| |
|
|
 Create a mask from the text object and save it as a channel. Create a mask from the text object and save it as a channel.
Mask > Create From Objects, CTRL+M, or use the  icon. icon.
Turn on Mask Marquee Visibility if you can't see the mask marquee (Mask > Marquee Visible, CTRL+H, or  .
.
Save the mask as a Channel:Mask > Save > Save As Channel
, use the default name of Alpha 1.
|
 |
|
|
| |
|
|
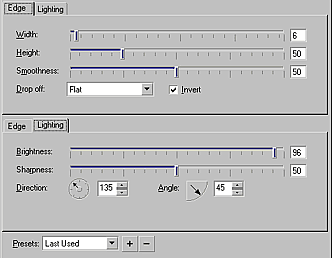
 Apply The Boss Effect. Apply The Boss Effect.
With the Text object selected and the mask present, apply the Boss Effect (Effects > 3D Effects > The Boss) using the settings shown.
Note: PP8 users should invert their mask first (Mask > Invert).

|
 |
|
|
| |
|
|
 Adjust the object with a Tone Curve. Adjust the object with a Tone Curve.
From the menu, choose Image > Adjust > Tone Curve, or use the keyboard shortcut CTRL+T. The Tone Curve dialogue opens.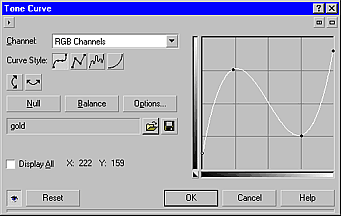
The Tone Curve filter lets you perform Colour and tonal corrections by adjusting pixel values plotted along a response curve that appears in a graph. The response curve represents the balance between shadows, midtones, and highlights. You can modify the response curve by adding nodes for curved or straight lines, drawing freehand, or using a gamma curve. Customized Tone Curves can be saved for later use.
The curve we want to make is shown opposite. Move your mouse cursor over one of the nodes on the curve. The cursor changes to either a hand in version 8 or a crosshair in versions 9 and 10. Once the cursor changes you can click to make new nodes or drag nodes to reposition them. Click on the line at the first and third vertical grid lines to create two new nodes. Reposition the nodes as shown. If you accidentally make another new node simply drag it off the curve at either end.
When you have finished editing the curve, save it for later use (press the disk icon  ) as gold.crv (extension should be automatically added by PP). Press OK to use the Tone Curve. ) as gold.crv (extension should be automatically added by PP). Press OK to use the Tone Curve.
If you would
like to use the Tone curve I used, you can download it HERE
(gold_tonecurve.zip)
The resultant image should look like this:

|
|
|
| |
|
|
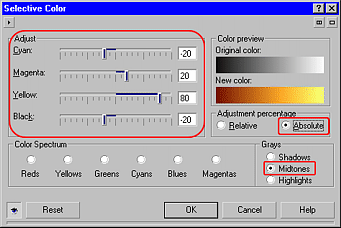
 Adjust the Selective Color of the object. Adjust the Selective Color of the object.
From the menu choose Image > Adjust > Selective Color.
Change the settings as shown then press OK.
Your image should now look like this:

|
 |
|
|
| |
|
|
 Load the mask, reduce it by 6 pixels and feather it by 1 pixel. Load the mask, reduce it by 6 pixels and feather it by 1 pixel.
Load the mask you saved as a channel previously
(Mask > Load > Alpha 1).
Reduce the size of the mask by 6 pixels:
Mask > Shape > Reduce
(vers 8-10) or Mask > Mask Outline >
Reduce (vers 11+), set width to 6 pixels, then press OK.
Feather the mask by 1 pixel:
Mask > Shape > Feather
(vers 8-10) or Mask > Mask Outline >
Feather (vers 11+),
set the width to 1 pixel and the direction to Average. Press OK.
|
 |
|
|
| |
|
|
 Create a new object and fill it with white. Create a new object and fill it with white.
Create a new object either using Object > Create > New Object or click the New Object icon  on the Objects Docker. Rename this object 'Highlight'. on the Objects Docker. Rename this object 'Highlight'.
Make sure your Paper colour is set to white (otherwise CTRL+Leftclick the white colour swatch on the palette.
Fill the masked area of the new object with white: Edit > Fill, select the Paper Color radio button then press OK.
Remove the mask (Mask > Remove, SHIFT+CTRL+R or  ) )
|
 |
|
|
| |
|
|
 Load the mask and feather it by 1 pixel. Load the mask and feather it by 1 pixel.
Load the mask you saved using Mask > Load > Alpha 1.
Feather the mask: Mask > Shape >
Feather (vers 8-10) or Mask >
Mask Outline > Feather (vers 11+), set the width to 1
pixel and the Direction to average. Press OK.
|
|
|
| |
|
|
 Create another new object and fill it with a grey fountain fill. Create another new object and fill it with a grey fountain fill.
Create another new object either using Object > Create > New Object or click the New Object icon on the Objects Docker. Rename this object 'Burn'
Select the Interactive Fill tool  (the smaller bucket - second icon on the Fill Tool Flyout), hold down the CTRL key to constrain the tool to the horizontal then drag the tool from just past the left end of the text to just past the right end of the text. The new object will now be fill with a gradient. (the smaller bucket - second icon on the Fill Tool Flyout), hold down the CTRL key to constrain the tool to the horizontal then drag the tool from just past the left end of the text to just past the right end of the text. The new object will now be fill with a gradient.
Now we need to change the gradient colours.
Click the left colour box of the gradient to select it then click on the 50% black swatch on the palette.
Click on the right colour box of the gradient and then click the white colour swatch on the palette.

|
|
|
| |
|
|
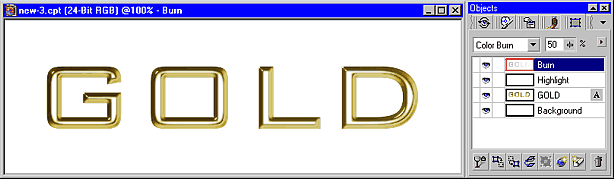
 Change the Merge Mode of the Burn object to Color Burn and reduce the opacity to 50%. Change the Merge Mode of the Burn object to Color Burn and reduce the opacity to 50%.
With the Burn object still selected in the objects Docker, change the Merge Mode to Color Burn.
Click the Opacity slider on the Objects Docker and reduce the opacity to 50%.
You image should now look like this:
|
|
|
| |
|
|
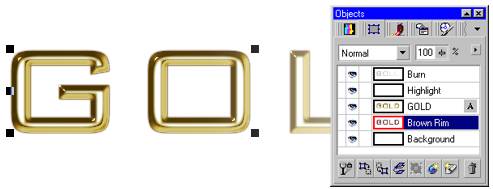
 Add a brown rim. Add a brown rim.
Create a third new object and rename it Brown Rim.
Right-click the Dark Brown Color swatch on the palette (just below the Pink colour swatch)
to change the fill colour to dark brown.
Fill the masked area of the new object with dark brown: Edit > Fill, make sure the Current Fill radio button is selected then press OK.
In the Object Docker, drag the Brown Rim object down between the GOLD text object and the background.
|
|
|
| |
|
|
 Add a drop shadow and background. Add a drop shadow and background.
Remove the mask (Mask > Remove or )
With the Brown rim object still selected, choose the Drop Shadow, then drag to create a drop shadow. Change the settings as you like.
Select the background in the Object Docker. Then fill it (Edit > Fill) with your favourite fill. Here I used the gold leafy Bitmap fill overlaid with sections of interlacing fill (another tutorial!).

|
|
|
| |
|
|
| |
|
|

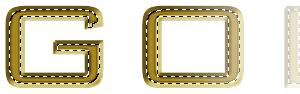
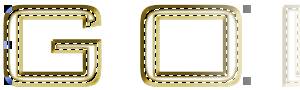
When using a larger font size, increase the mask reduction and feathering values accordingly. For the example show just above the font size was 200 points and so the mask reduction in step 9 was 8 pixels rather than 6, while the brown rim was feathered to 2 pixels rather than 1.
|
|
|
| |
|
|
|