| |
|
|
This technique can be used in Corel Photo-Paint versions 8 and up. One step near the end requires an effect which became available in version 9 but a work-around method is provided.
Steps:
|
|
|
| |
|
 Create a new image: Create a new image:  , 500 x 300 pixels, 72 dpi, white background. , 500 x 300 pixels, 72 dpi, white background.
|
|
|
| |
|
|
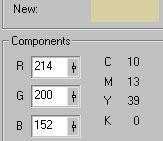
 Change the Paint colour. Change the Paint colour.
Double-click the Paint colour swatch in the Status Bar.
Change the RGB numbers to = R:214, G:200, B:152.
|
 |
|
|
| |
|
|
 Create and Centre the text. Create and Centre the text.
 Click the text tool. Change the Property bar settings to: Click the text tool. Change the Property bar settings to:
Font: Arrus Blk BT,
Size: 120
Line Spacing: 76
Anti-aliasing: On
Horizontal Alignment: Justify Center
Click near the top centre of your image and type ‘OLD GOLD' in two lines, then click the Object Picker tool  to render the text. to render the text.
Use Object > Arrange > Align and Distribute to centre the text to the image.
I used Arrus Blk BT but you could also use any wide/bold serif font such as Activa Bold, Aldine401 BT (bold), Arial (bold), Arial Black, or even Times New Roman (bold) or Roman (bold).
|
|
|
| |
|
|
 Create a duplicate of the text. Create a duplicate of the text.
Object > Duplicate or CTRL+D
|
|
|
| |
|
|
 Turn on Lock Transparency. Turn on Lock Transparency.
Turn on Lock Transparency - click the  icon either on the Object Docker or on the Mask/Object Toolbar. icon either on the Object Docker or on the Mask/Object Toolbar.
|
|
|
| |
|
|
 Fill the duplicate text object. Fill the duplicate text object.
The upper (duplicate) text should now be selected in the Object Docker (if not, select it).
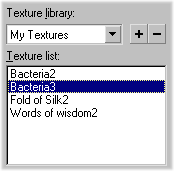
From the menu select Edit > Fill. Select the Texture Fill icon  and click Edit in the Edit Fill and Transparency dialogue box. The Texture Fill dialogue opens. and click Edit in the Edit Fill and Transparency dialogue box. The Texture Fill dialogue opens.
Change the following settings:
Texture Library: Samples 5
Texture List Style: Bacteria
Shade Colour: 100% Black
Light Colour: R:214, G:200, B:152 (same as current Paint colour)
Other settings: see adjacent screen shot
|
 |
|
|
| |
|
|
Lock all the parameter locks then press the Preview button to view your texture.
Saving the texture for later use:
You can save this custom texture for later use after you have completed changing the parameters. Follow the instructions in the Tip: Creating & Storing Your Own Texture Fills. I created a new texture Library called My Textures and added my custom textures there.
|
 |
|
|
| |
|
| Press OK on the Texture Fill dialogue, then OK on the Edit Fill and Transparency Dialogue to fill the duplicate with the texture. |
 |
|
|
| |
|
|
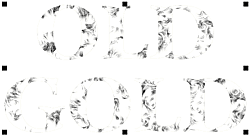
 Apply a Trace Contour Effect. Apply a Trace Contour Effect.
With the duplicate
object still selected, from the menu select Effects
> Contour > Trace Contour (Effects > 2D Effects
> Trace Contour in P-P Version 8).
Use a Level of 100, Edge Type = Upper. Press OK.
|
 |
|
|
| |
|
|
 Transform the Image's Threshold. Transform the Image's Threshold.
From the menu choose Image > Transform > Threshold .
In the Threshold dialogue box, click the Reset button, choose bi-level as the threshold type then click OK.
|
 |
|
|
| |
|
|
 Apply a Whirlpool effect. Apply a Whirlpool effect.
From the menu
choose Effects > Distort > Whirlpool
(Effects > 2D Effects > Whirlpool in vers 8).
In the Whirlpool dialogue click the Reset button, then change the Streak Detail setting to 0. Press OK.
|
 |
|
|
| |
|
|
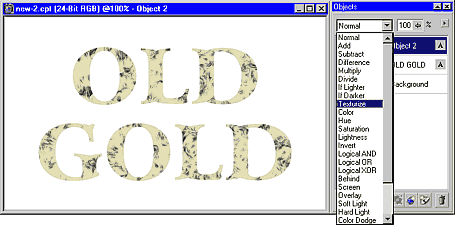
 Change the Merge Mode (Paint Mode) and Transparency. Change the Merge Mode (Paint Mode) and Transparency.
With the duplicate object still selected in the Objects Docker, click on the Merge Mode drop down list and select Texturize.
Using the slider on the Object Docker, adjust the object's transparency to 80%.
|
 |
|
|
| |
|
|
 Combine the two text objects. Combine the two text objects.
Hold down your SHIFT key and click the lower text object in the Object Docker so both text objects are selected and highlighted.
Combine the two objects using either Object > Combine > Combine Objects Together, CTRL+ALT+DnArrow, or click the  icon on the Objects Docker (! NOT the one on the Property bar - this will group the objects rather than combine them!). icon on the Objects Docker (! NOT the one on the Property bar - this will group the objects rather than combine them!).
Now you should just have a background and one object (selected) in your Objects Docker.
|
|
|
| |
|
|
 Add a little noise. Add a little noise.
From the menu select Effects > Noise > Add Noise.
Click the Reset button to restore default settings, change the Type to Uniform, then press OK.
|
 |
|
|
| |
|
 Unlock the Transparency Unlock the Transparency
|
|
|
| |
|
|
 (A) Add a Plastic Texture. (A) Add a Plastic Texture.
This step is
limited to P-P versions 9, 10 and beyond.
Otherwise use step 14B.
Choose Effects
> Texture > Plastic. (This effect is NOT available
in version 8)
Click the Reset button to restore defaults then change the Depth to 5 and the Smoothness to 75. Press OK.
or
|
 |
|
|
| |
|
|
(B). Add a Boss Effect.
This step can be used in
P-P 8, 9 or 10 +.
Create a mask from the object  , then invert it (Mask > Invert, SHIFT+CTRL+I, or , then invert it (Mask > Invert, SHIFT+CTRL+I, or  from the Mask/Object Toolbar. from the Mask/Object Toolbar.
From the Effects menu choose 3D Effects > The Boss. Change the settings to:
[Edge Tab]
width=13, height= 34, smoothness = 75, drop-off = Gaussian, (no invert)
[Lighting Tab]
brightness = 65, sharpness = 5, direction = 135, angle = 60.
Press OK.
Remove the mask (Mask > Remove, CTRL+SHIFT+R, or  ). ).
|
 |
|
|
| |
|
|
 Add a drop shadow. Add a drop shadow.
Select the Drop shadow tool and add an Average shadow to the bottom right.
|
 |
|
|
| |
|
|
 Add a fill to the background object. Add a fill to the background object.
I used the Texture Fill; Samples 7; Folds of Silk with default parameters.
|
 |
|
|
| |
|
|
|
| |
|

|
|
| |
|
|
|
| |
|
|
For a slightly brighter gold tint, select the text object and adjust the HSL ( Image > Adjust > Hue Saturation Lightness )
Change the settings to H= -5, S= 20, L=0 then press OK.
|
 |
|
|
| |
|
| Try Embossing (Effects > 3D > Emboss) rather than using a plastic texture or The Boss Effect. |
 |
|
|
| |
|
| For a beaten look, try a setting of Smoothness = 15 (instead of 75) when using the Plastic Texture effect. |
 |
|
|
| |
|
|
|