Creating
a Lens Text Effect in Corel Photo-Paint
by David Mutch September, 2002
Creating
a Lens Text Effect in Corel Photo-Paint
by David Mutch September, 2002
The basis of this effect is extremely simple but it has some many possible combinations and variation possibilities it is worth while describing here. The effect is limited only by your imagination, and your choice of image/text combinations. The tutorial has been written using Corel Photo-Paint version 10 and thus can also be done 'as is' in version 9 and above. Version 8 has fewer lenses available but similar effects can be achieved using merge modes if the required lens is unavailable.
The tutorial is divided into two parts. The first part shows the steps to create the basic effect. The second part shows just some of the numerous variations and modifications you can use to create a large range of different visual effects.
PART 1: The Basic Steps:
1.
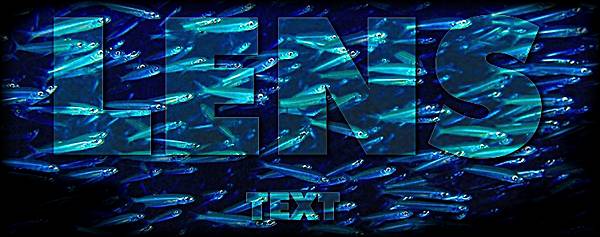
Base image.
Choose an image you like to place the text effect on. In the title graphic and
for these basic steps I have chosen image 634091.wi from the Photos/Ocean folder
of Corel Photo-Paint 10, CD #3.
2.
Duplicate the image.
Use CTRL+D or in the Object Docker, drag the background image object onto the
New Object icon then release).
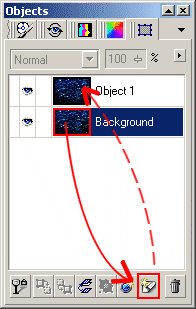
Copying an existing object
by dragging to the New Object icon
in the Objects Docker.
3.
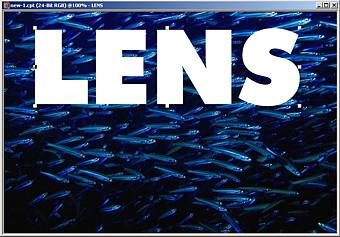
Create some text.
The precise colour, font and size are entirely up to you.
However the effect works best with a thick heavy font, often using a contrasting colour, 100% black, or 100% white.
In this example I have used white text, Futura Xblk BT font at 240 points.
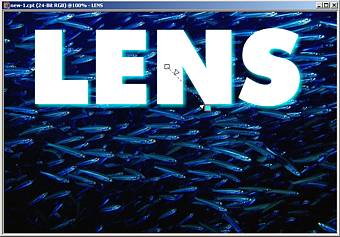
4.
Add a drop shadow to the text.
Again, the actual parameters of the drop shadow will depend on your image, the
text and the effect you wish to create. The in title banner of this tutorial
I used a black drop shadow, but in the example here I have used a cyan coloured,
average feather direction drop shadow.
5.
Clip the child object to the parent object.
Using the Object Docker, drag the text object below the duplicated image. Click
in the column between the eye icon and the thumbnail of the duplicated image
object (now on top) to display the 'object clip' paperclip icon. The upper image
will now be clipped to the text object below it.
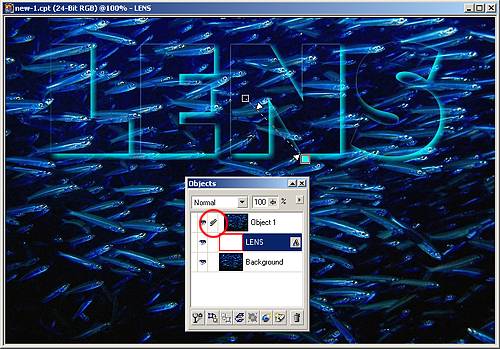
6. Adding a Lens.
Using the object Docker, select the topmost object - the clipped image. Create
a Lens, either from the menu (Object > Create > New Lens), or by clicking
the icon at the bottom of the Object Docker. The New Lens dialogue box appears.
Select Hue/Saturation/Lightness from the list and press OK. The Hue/Saturation/Lightness
dialogue box appears. Change the Lightness setting to 20 then press OK. All
of the objects within the image construct are now affected by the Lens.
Clipped Objects occur in pairs - and are described as Child and Parent objects. The object with the paperclip on it is known as the Child object, while the object below it, which constrains the shape of the child object, is the Parent object.
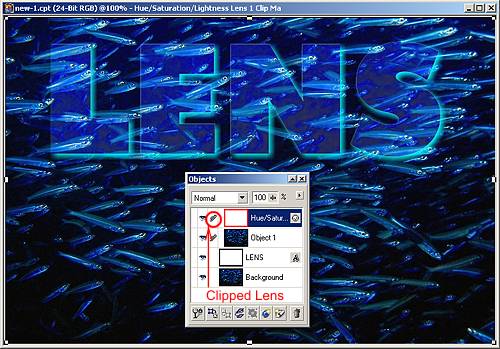
7.
Clip the Lens.
Click the object clip column in the Object Docker for the Lens (a paperclip
icon will appear between the visibility ‘eye’ and the lens thumbnail,
which looks like a plain white box. The affect of the Lens is now constrained
(clipped) to affect only the parent object below it. That object is in turn
clipped to the text.
8.
Transportability!
One of the really great things about clipped objects and lenses is that they
can be moved/repositioned against their backgrounds without changing the effect.
Select the Object Picker tool, then select the text object in the Object Docker.
In the main editing window, click and drag the text to different positions,
fitting it exactly where you want it to be. Notice how both the object clip
and the lens clip follow each other and affect only the area of the image bounded
by the text object boundaries. Magic!
9.
Save.
Save the basic construct
as lens.cpt (in Corel Photo-Paint native format to retain objects and masks).
PART TWO: Variations on the Original Theme
There are many ways you can change the original effect. These include using different types of Lenses, applying different Merge Modes to the clipped Parent or Child objects, changing the text colour which affects the result when using different Merge Modes, changing the Shadow, and even using multiple shadows.
The effect will appear differently when applied to different images. Sometimes a particular effect will work well with one image but not with another. Therefore you should experiment with different variations on a variety of images to explore the possibilities of this effect more completely.
NOTES:
Editing Lenses: If you wish to change or edit a lens after it has been created, right-click on the text name of the lens in the Object Docker and choose Edit Lens.
Deleting/Removing Lenses: Choose the lens in the Object Docker then click the Delete Object icon (trash can) in the Objects Docker.
Here are a few suggestions for you to try:
A:
Blur/Sharpen:
Start with lens.cpt then change:
- Text is 100% black, with an outside drop shadow,
- Background is blurred with a mild Gaussian blur,
- Clipped image (child object) merge mode = Hard Light, 100% Opacity
- Lens over child object = Sharpen.
Image A (part)
B.Green:
Start with lens.cpt then change:
- Text is 100% black, with an outside drop shadow,
- Lens over child object = Color Balance, with C-R = -76, M-G = 0, Y-B = 92
- Clipped image (child object) merge mode = Lightness, 100% Opacity
Image B (part)
C.
Colour Lens:
Open CD#3: photos/nature/insects/52026.wi from the P-P 10 CD set
- Text object = Futura Xblk BT at 180 points, white in colour
- Create a drop shadow on text: 100% black, average, lower right, then split
the drop shadow from the text (right-click on Object Docker object text and
select Drop Shadow > Split Shadow to create a new ‘shadow’ object
below the text object).
- Then create another drop shadow of the text object: white, inside, upper left
- Group text object and split shadow object.
- Duplicate background image to create child object and clip this to the text
object. Clipped child object has no lens or merge mode changes.
- Create a new Desaturate Lens then reposition to be immediately above the background
image.
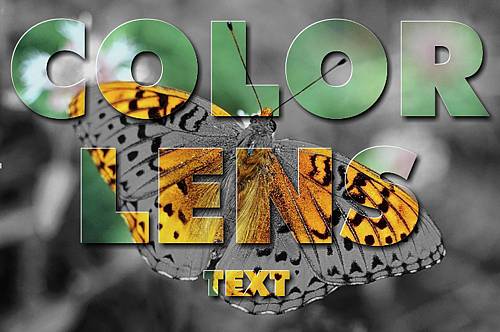
Image C (reduced)
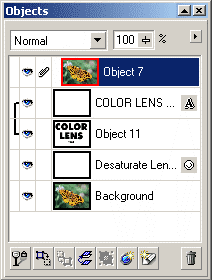 Object Docker for Image C |
D.
Scatter - Ice:
- Open CD#3: photos/Landscap/841052.wi from the P-P 9 CD set
- Type some large white text (e.g. Futura Xblk BT at 180 points).
- Duplicate the background and place above the text
- Clip the duplicated (child) object t the text (parent) object
- Select the child image object and add a drop shadow to it: shadow direction
= 135, shadow offset = 0, opacity = 100, feather = 1, feather direction = outside,
feather edge = flat, colour = black.
- Select the text (parent) object and add a drop shadow: shadow direction =
309, shadow offset = 12, opacity = 100, feather = 10, feather direction = average,
colour = black
- Create a new lens: scatter, H=6, V=6. Reposition the scatterlens to be immediately
above the background object.
- Create a new lens: Sharpen at default(reset) settings. Position tis lens immediately
above the child image object the clip the lens to the child image object.
- Create a new lens: Brightness/Contrast/Intensity, B = 5, C = 26, I = 16. Place
this lens above everything else in the Object Docker and the n clip the lens
to the objects below it.
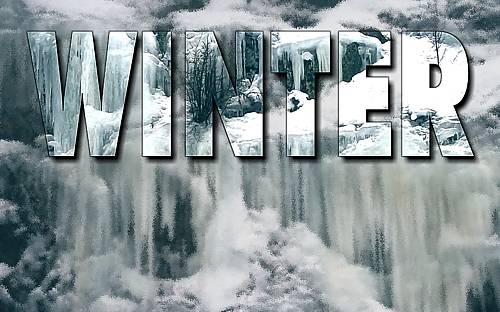
Image D
(reduced)
 Closeup of Image D (100%) |
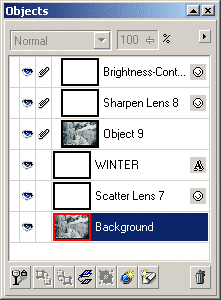 Object Docker for Image D |
E:
Posterization:
- Open CD#3: photos/Indstrl/847045.wi from the P-P 9 CD set.
- Duplicate the background.
- Create a new lens: Posterize, level = 5.
- If necessary, reposition the lens above the duplicated background and clip
it to it.
- Make the duplicated image the active object (select it in the Object Docker
so the thumbnail has a red border)
- Select the Eraser Tool and change the Property bar settings of this tool to
a wide brush nib with highly feathered edges and a high transparency.
- Brush away sections of the duplicated object to reveal the original background
beneath it. The erased sections are not affected by the posterize lens.
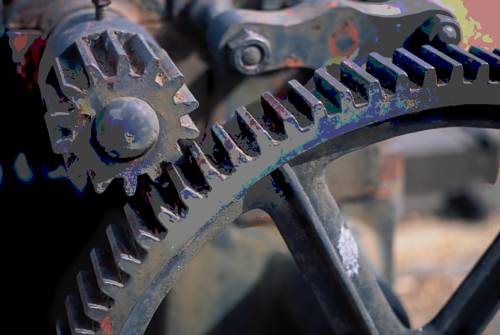
Image E
(reduced)
F:
Pixellation/Distortion using an object.
- Open CD#3: photos/People/892053.wi from the P-P 9 CD set.
- Make the rulers visible (View > Rulers), then drag a horizontal and a vertical
guideline from the rulers so that they intersect in the centre of the image..
Turn on Snap to Guidelines in the View menu (CRTL+;)
- Select the Oval mask tool and ensure the mask mode is set to additive. Click
and hold the cursor at the cross point of the guidelines and while the mouse
button I depressed, also hold down the SHIFT and CTRL keys on the keyboard and
draw a circular mask from the centre of the image until almost the edges of
the image.
- Change the mask mode to subtractive and repeat the mask drawing exercise to
create a hollow band mask rather than the full circle (turn on the mask overlay
if this makes it easie to see the created mask band.
- Continue creating bands of mask within the circle by switching between additive
and subtractive mask modes. Make about three concentric bands with the innermost
one a solid circle.
- Save the mask as a channel in case you need it again later.
- Create a new object and fill it with black. The mask will constrain the fill
so that you create an object containing several concentric black rings the centre
of which is a solid black circle.
- Remove the mask.
- Select the background image and duplicate it. If necessary, reposition it
above the concentric circle object.
- Clip the duplicated image to the circles.
- Create a new lens: Pixelate, Square, Wand H = 20, Opacity = 100.
- Reposition the pixelate lens immediately above the background object.
- Create a new lens: Sharpen at the default settings.
- If necessary, reposition the sharpen lens above the clipped child image and
ten clip the lens to the child image.
- Select the circle object and add a drop shadow: direction = 315, offset =
14, opacity = 100, feather= 10, feather direction = inside, feather edge = squared.
Image F (reduced)
 The mask I used, when viewed in Pant on Mask Mode. |
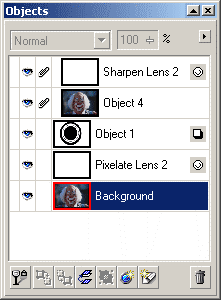 Object Docker for image F |
I have also made a small
avi movie of the clipped circlular lens moving across the image of the clown.
The movie has been imported into a Flash 6 (MX) presentation so you will need
Flash 6 to view it.
Click HERE
to see it (only 16K).
| T e
x t E f f e c t s # 3 M
e n u : <- PREVIOUS || NEXT ->
|
||||||||||||
|
||||||||||||