
| Guide: |
|
Advanced |
(How to create 'torn edges' in Corel PhotoPaint 8)
ADVANCED TECHNIQUES (Further suggestions for exploration)
|
The main emphasis on this section is to encourage exploration of the program. Corel PhotoPaint provides an almost endless variety of means to an end. Therefore, I am confident that with almost anything I suggest here, you should be able to come up with better ideas almost as soon as you start exploring. Please let me know how you go. I would be pleased to add ideas and examples from others to this section. |
||||
|
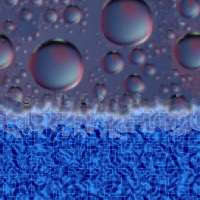
Adjusting Merge Modes and Opacity One of the main methods to create an almost infinite number of variations in the techniques described here is to alter the merge mode, opacity settings of one or more layers/objects. The most effective layer/object to change seems to be the 'Under' layer. Changing this layer alters the thin region between the drop shadow and the fill used, making the tear appear as though it had several layers, or as if some of the print had peeled off separately. Lets call this the chaotic region. The intensity of the effect of different modes varies according to the darkness of the original object. (Refer the insert in Figure 8, Part 3)(or below). Also, this technique was largely responsible for creating the wider horizontal chaotic region between the bubbles and the liquid in Example 3 (Intro section)(or below). Adjusting the overlay offset between the two fills (refer below) was also important. The original 'Rip' (black object) can also be manipulated by merge modes (or removed entirely) to also alter the overall effect. Try it. |
||||
|
|
||||||||||||||||||||||||||||||||||
|
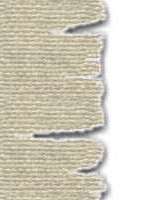
Adjusting Pixel Offset Between Similar Objects The width of the chaotic region changes as the Under and Over layers are shifted against each other.
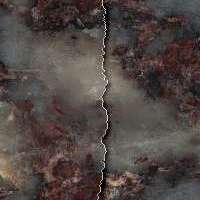
In Example 3 (above) the layers were moved almost 15 pixels from their original positions set by the Fill command. Generally, I found that a shift of 2-5 pixels created a moderately realistic chaotic region for paper type tears. For less tearable substances such as stone or granite, which tend to crack rather than tear, I found that a very thin offset is better. However to make the chaotic region appear distinct even with such a small change, the 'Under' object actually had be be completely inverted (merge mode=invert) (Example 5).
|
|||||||||||||||||||||
|
Making Really Large Rips and Tears The really large rips in the background of Part 2 (example 7, below)were created by erasing sections of the black 'Rip' object before the displacement step (step 5, Part 2).
It is important to note several aspects of this method:
|
|||||||||||||||||||||
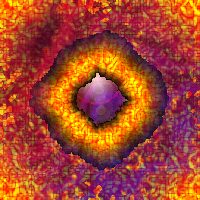
Why just be satisfied with linear rips and tears? I tried experimenting with circular holes. One way to paint a nice round hole is to create a circular mask (mask circle tool with shift and ctrl held down), then use the stroke mask took to place the black paint. The stroke mask tool still works well even when you are using orbits. To make a long stroy short, I created the following bizzare image using two circular black objects created with the dirt orbit and the stroke mask. The circles were concentric, each at approximately equidistance thrids of the image. Each circle object was then displaced and then a radial blur applied. Several fills were used, each custom made using PhotPaints built-in textures. Much experimentation with merge modes followed, as described above. The final image looks a bit like a cosmic explosion. |
|||||||||||||||||||||
|
The torn text used as a title graphic for this tutorial was created as follows:
|
||||
"See you next time."
-David Mutch-
| - Return to PhotoPaint 8 Main Tutorials Page - | - Contact Us - | NEXT -> |
|
Created
and produced by David Mutch PhD, Visionary Voyager Corporation (ACN
085 264 080). |
||||
| Disclaimer | ||||