'Torn Edges'
in Corel
PhotoPaint 8
|
INTRO
| 2 | 3 | 4 |
|
Notes:
|
||||
STEP
1
|
STEP 1: Creating a New Image - Click File/New' or click the New icon on the Property Bar. - In the Create New Image' dialogue box, use the following settings: 24 bit RGB colour image; colour: white (R255, G255, B255), leave the No Background' box Unselected); width 200; height 200; 72 dpi resolution. - Click OK to create the new white image. |
||||
STEP
2
|
STEP 2: Creating a new object/layer for the torn edge object - Click Object/Create/New Object' or click the New Object' icon near the bottom of the Objects Docker to create a new object for our project. Note: Later, we need to make a mask of only part of the object on a layer, and so we cannot use the background layer to create the object. (Try it later if you like - go through the tutorial without this step, then when you get to step 7 (creating the masks) you will find you can only create a mask of the entire background layer and not just the black area we create). - Double-click the name of this new object on the Objects Docker to bring up the object's properties dialogue box. - Rename the object Rip'. |
||||
STEP
3
|
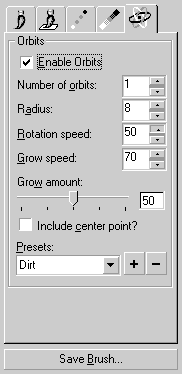
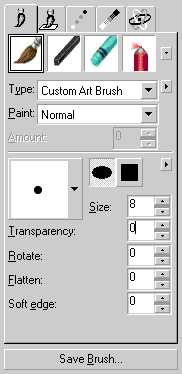
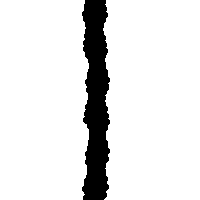
STEP 3: Create the basic edge. Note: For a torn edge to be realistic, it needs a degree of randomness/chaos in the actual edge. To assist us with this, we use PP8's Orbit feature. However a suitable effect can simply be created using slight shakes of the mouse while drawing the initial linein previous versions of PhotoPaint. - Select black (R0, G0, B0) as the paint colour by left-clicking on the black colour swatch on the bottom of the colour pallet. - Select the Paint tool (brush) from the Toolbox. Make sure that the Tool Settings Rollup is visible. - Select the Art brush, type Custom Brush, paint Normal, from the Paint Tool Settings Rollup. (Fig 1) - Click the Orbits tab on the Paint Tools Settings Rollup. - Check the Enable Orbits' box, then choose Dirt' from the presets. Change the radius to 8. (Fig 2) -Click back on the brush tab on the Rollup (or use the Property Bar), select the round/oval nib shape and change the size to 8. (Change these after you have selected the dirt' orbits preset otherwise the actual nib size and shape is determined by the preset). - On the Rip' object, paint a ragged line down the centre from top to bottom (Fig 3). You may need to go back over the line once more to eliminate any white holes' left in the line. Also, if you prefer a nearly straight tear, you may wish to hold the ctrl key down to help make the line straighter. |
||||
 Fig 2. Step 3, enable Orbits, select the 'dirt' preset', change the radius to 8. |
||||
 Fig 1. Step 3, select the custom art brush from the Paint Tools Settings Rollup |
||||
 Fig 3. Step 3,the initial ragged line. |
||||
| - Return to PhotoPaint 8 Main Tutorials Page - | - Contact Us - | NEXT -> |
|
Created
and produced by David Mutch PhD, Visionary Voyager Corporation (ACN
085 264 080). |
||||
| Disclaimer | ||||