How to create
'Torn Edges'
in Corel
PhotoPaint 8

PART 3
<-prev  next->

INTRO | 1 | 2 | 4
Adv. Section
Quick Steps

      PART 3: BASIC METHOD: Masks, Fill and final adjustments  


STEP
   7
 

STEP 7: Create the masks.

Note: This torn edge effect requires that two masks be created from the same object. However the second mask is offset and slightly feathered from the first.

- Create the first mask as follows: With the ‘Rip' object still selected, select ‘Mask/ Create from Object' (Ctrl M) from the Menu. Click the ‘Show Mask Marques' icon on the main Toolbar to see it if you wish.

- Save the mask as a Channel and name it ‘Over mask'.

- Modify the first mask to create the second as follows: Click ‘Mask/ Shape/ Expand' from the menu and choose a width of 2. Click OK.

- Click ‘Mask/ Shape/ Feather' and choose width=2, direction outside, edges=curved. Click OK.

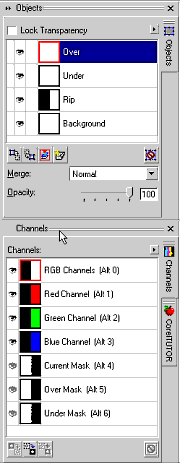
- Save the second mask as a channel and name it ‘Under mask'. The Channels sections of your Docker should appear as in Fig 7.


Fig 7. Step 7, the Objects and Channels Dockers contents.


STEP
   8
 

STEP 8: Fill ‘er Up. Adding the paper fill patterns.

Note: For this tutorial I have selected a bitmap fill from the 3rd Corel 8 CD Rom. You may use almost any fill you wish, including any of the auto-generated texture fills available from the fill dialogue box. If you need to write text to the ‘paper' later it may be best to use a relatively light coloured fill.

- Add 2 new objects by clicking the ‘New Object' icon on the Objects Docker twice. Name the uppermost one ‘Over' and the lower one ‘Under' (Fig 7, Objects Docker). These are required to give the edge a region which appears to have the top surface of the paper separated from the lower surface within the torn region (a chaotic region !).

- Make sure the second of our masks (the ‘Under mask') is present. If you need to load it back from the Channels, make sure that the mask merge mode is set to normal.

- Click the Object Selector tool (pointer) on the Toolbox and select the ‘Under' object in the Objects Docker.

- Fill the ‘Under' object. Click ‘Edit/ Fill', select Bitmap fill, and then ‘Edit' from the ‘Edit Fill and Transparency' dialogue box. The ‘Bitmap Fill' dialogue now appears.

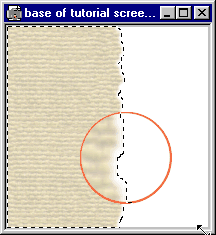
- Click ‘Load' and then locate the file ‘Paper01m.cpt' in the ‘Tiles/Paper' folder of CD#3 of the Corel Draw 8 set. Leave all the settings as they are, then click OK to load the tile. Click OK again to paste the fill into the ‘Under' object's masked area. If you zoom in to the edge region with the mask marque showing you will see a faded edge on this object (Fig 8).

- Remove the existing mask (Mask/Remove) and then load the ‘Over mask' (merge mode normal).

- Select the ‘Over' object and then fill this object with the same fill as before.

What, you didn't see anything change? No worries, you will in a moment.


Fig 8. Step 4, the black-filled LHS of the 'Rip' object
 
 
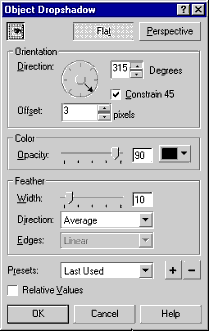
Fig 9. The 'Under' object's drop shadow settings.


STEP
   9
 

STEP 9: Drop shadow and final adjustments.

- Select the ‘Under' Object and then add a drop shadow (Object/Drop Shadow). I used the following settings: Flat, 315 degrees, Offset=3, Opacity=90%, Feather width=10, Direction=average (Fig 9).

- Right-click on the two selected objects in the Objects Docker (the ‘Under' object and its shadow) and ungroup them.

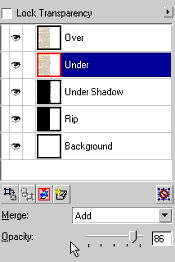
- Select the ‘Under' object (only it, not with the drop shadow) and change the merge mode to ‘Add' and the Opacity to 86% (all using the Objects Docker controls) (Fig 10).

- With the Object Picker tool select the ‘Over' object move it 2 pixels to the left (hit the keyboard right arrow twice). Change the merge mode of this object to ‘If Lighter'.

(You may wish to experiment with the merge mode and the opacity of the upper layer object, as described in ore detail in the Advanced section. You can obtain a great many variations to this effect just by tweeking these two controls in the final step). (Fig 11)


Fig 10. The 'Under' object's merge mode and opacity settings.


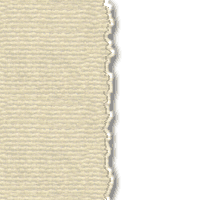
Fig11. The final appearance of the image created in the BASIC tutorial.


- Return to PhotoPaint 8 Main Tutorials Page -  - Contact Us - NEXT ->


Created and produced by David Mutch PhD, Visionary Voyager Corporation (ACN 085 264 080).
Melbourne, Australia. Copyright ©, 1999. All rights reserved.
These tutorials may be used freely by users of Corel® Corporation's graphics applications. However, all custom graphics, design, programming and layout remain the property of Visionary Voyager Corporation. Comments, suggestions and questions are most welcome.
Please contact us anytime by sending e-mail to: click here

Disclaimer