How to Use Corel PhotoPaint 8 to Make Web-Friendly GIF & JPEG Images
How to
Use Corel PhotoPaint 8 to Make Web-Friendly GIF & JPEG Images
| Web Works | Part 3 - JPEGs 1 |
|
JPEG
Images
|
|
|
Browser
differences when displaying JPEGs.
|
|
|
Saving
JPEGs and Layered Images. If you have completed all steps of the image creation process, you may then use File/Save As.. (from the Menu) to save the file as a JPEG with the .jpg extension (JPEG standard file extension type). However, you may wish to just save a snapshot of the current image as a JPEG and then continue to work on it. To keep the image in the current editable format, use Photo-Paint's Export feature. Click File/Export.. from the Menu. Then select the image type from the 'Save As Type..' drop down selector (Figure 1). The Export feature will not alter the format of the current image and will allow you to retain all objects, layers and masks. Click the 'Save' button. You will probably see one or more warning dialogs concerning the inability to save multiple objects or masks with this format. Click OK to to continue and close any of these pop up messages.
|
|
To export your image in the JPEG format, select 'JPEG Bitmap image' in the 'Save As Type...' dropdown selector.
|
|
The
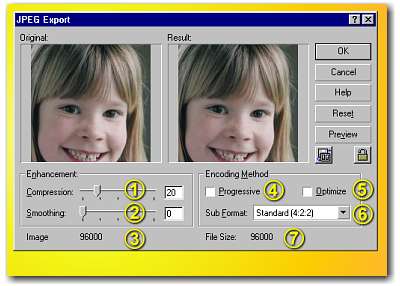
JPEG Export dialog box There are many options when saving JPEG images in Corel PhotoPaint 8. There are at least 2 different compression methods, virtually an infinite compression level specification (0-100%), smoothing of the image (interpolation of colours in adjacent pixels) during compression, the ability to save the image as' progressive' (similar to interlacing for GIF images - see below), plus the ability to optimize the compression encoding process. (Refer to Figure 2).
|
|
|
Figure 3 depicts several of the additional user-friendly options in PhotoPaint 8's JPEG Export dialog (these are also present in many other PhotoPaint 8 dialogs too) which demonstrate some of the reasons I prefer PhotoPaint 8 for producing images for the WWW compared to other programs such as PhotoShop. The Lock
Preview icon The instant preview
updates the resultant file size also. The Preview Mode
toggle button
|
|
|
|
The lock icon allows for an instant preview of the current settings, while the icon with the small computer screens toggles between a single 'results' pane and dual 'original' and 'results' panes. The Original and Result panes allow you to view the result of your compression/save settings before commitment. The preview images can be enlarged or reduced by clicking with the left (zoom in) and right mouse (zoom out) buttons. The image can also be moved (panned) within the pane by dragging the hand cursor with the left mouse button. The latter manipulations must be performed in the 'Original' pane if both the Original and Result panes are displayed. |
 Figure
1:
Figure
1:
 Figure
2:
Figure
2: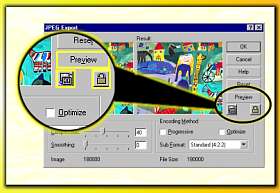 Figure
3:
Figure
3: