How to Use Corel PhotoPaint 8 to Make Web-Friendly GIF & JPEG Images
How to Use Corel PhotoPaint
8 to Make Web-Friendly GIF & JPEG Images
| Web Works | Part 7 - GIFs 3 |
|
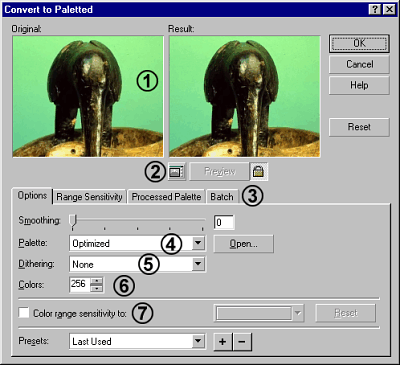
To convert any image into the GIF format (or any other indexed palette image for that matter) the image must first be converted to 256 colours or less. The most frequent conversion is usually from 24 bit RGB images or 24 or 32 bit CMYK (print) images. However almost any type of image, even grayscale images (16, 8 or lower bit-depths) and 1 bit Black and white images can be converted to and from any other format using Corel PhotoPaint 8. To convert an image from one format to another in Corel PhotoPaint 8 use the Image/Convert to Paletted... Dialog box command from the menu (Figure 12).
|
|
Figure 12:
For explanations of the individual components refer to the following list |
 |
|
|
|
|
Web-Friendly
8-bit Palettes. The Netscape palette has been discussed previously with some additional usage notes here, so lets look at some of the others. First though, a word of warning ...
|
|
|
The MSIE palette shonk. The MSIE palette contains exactly the same set of 216 colours as the Netscape palette (merely inverted and slightly re-arranged, which makes no difference at all !) and is functionally identical to the Netscape palette. I personally do not use it as it is obviously a clear case of an attempt by Microsoft to brand someone else's good idea as their own, and steal any associated glory. To check this for yourself bring up the Convert to Paletted dialog box for an image. Select the Netscape palette and then press the Processed Palette tab to view the palette. Click on any colour swatch to check that all the colours conform to the Web Safe Palette scheme shown previously in Table 1. Every colour within the MSIE palette correlates precisely with a Netscape palette colour. The same ! Be aware that this type of activity by Microsoft is rife throughout the entire software industry spectrum and that very few innovative ideas are actually conceived by Microsoft. The ONLY people that can ever make a difference to change such blatant intellectual property abuse are you and I - the consumers. Stand up and be counted and don't be bullied and bluffed by the Microsoft monopoly. Use another product or workaround whenever possible please. The world will thank you for it in due course. Lets move on to some more constructive issues and pretend that the MSIE palette never existed.
|
|
The Adaptive palette attempts to preserve the individual colours of the original image. The Adaptive palette uses a standard adaptive colour algorithm to retain as much of the original image colour information but will alter those colours which fall out of the range of the 256 most frequent colours back into existing palette colours. Very few controls over this process are available. However, some aspects of Adaptive palette conversion process can be controlled through the use of the Smoothing Slider (in the Options Tab, refer Figure 12) and also by reducing the number of colours used in the processed palette. Investigate the effects of smoothing and colour reduction by making some changes to these options and then viewing the resultant palette in the Processed Palette tab.
|
|
|
The Optimized palette creates a palette based on the highest percentage of colors in the image. If you choose Optimized, you can enable the Color Range Sensitivity To check box and choose a color from the image using the Eyedropper tool (more on this soon). In addition, further refinement of the optimisation process can be produced using the controls in the Range Sensitivity tab, which are ONLY available when using the Optimized palette. Because the Optimized palette is so powerful, I have devoted a much larger section to describing its capabilities below.
|
|
|
Netscape palette usage. (Table 1 and Figure 11) is described in detail above. It is the most often used (and overused) for Web GIF images and thus any image produced using this palette will appear similarly on almost all web browsers. However, I rarely use the Netscape palette now as I believe it is almost totally redundant now. These days, I almost always use the Optimized palette for all my GIF images. Find out 'How' in the next section and 'Why' in the ASIDE box.
|
|
|
|
Using
the Convert to Paletted Command. While the Convert to Paletted Dialog box is open, click the small down-arrow on the Palette selector dropdown and change to another palette. Note the change in the results pane. While changing from one palette to another, notice that some palettes are FIXED and the number of available colours roller is grayed out, meaning that the number of colours cannot be changed. Selecting either the Adaptive or Optimized palettes activates the number of colours roller and allows the number to be changed. These two palettes are customisable and variable. Change the type of dithering and view the results. Dithering creates regions of blended colour pixels between adjacent pixels of otherwise contrasting colours. This smoothes the image somewhat. Choosing 'none' for dithering helps reduce the image file size.
|
