PP9 has too many new features
and changes to detail them all here. However there are some which are
worth a brief mention at least and should be examined in detail in later
tutorials on this site.
Image Mode (ex Convert to...) Menu item
PP9 now uses the more conventional term of ‘Mode' when converting
image formats rather than the Convert To... command in version
8.
 |
|
Figure
41. Gif Export transparency mask.
|
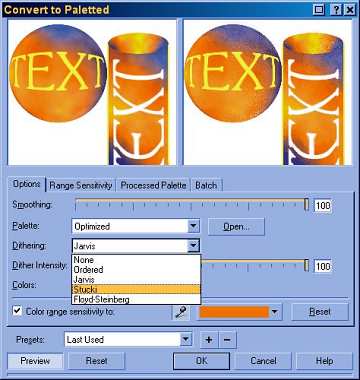
In addition, many of the
Mode conversion dialogue boxes have been made more useful and friendly,
including the one for Paletted (8 bit) images (Figure 41).
This dialogue is typical
of the changes in the user interface throughout PP9. Almost all sliders
have been changed to an ultra thin, solid scale (rather than a block
scale), while the activity progress bars in most dialogues boxes is
reduced to an ultra thin bar along the very bottom of the dialogue box
(just below the bottom row of buttons). I like these changes very much
as they are just as informative as previous methods but save a great
deal on screen space which is something a computer graphics person can
never have too much of.
PP9 users can also apply,
extract or embed ICC monitor profile information if available. Users
can also customize the RGB space for their particular system to reduce
colour incompatibilities.
Palette Improvements.
Like Draw 9, PP9 users can now view and use multiple on screen palettes
simultaneously. Custom palettes can be created from the visible portion
of any active document, or from an entire document. The use of masks
can serve to control the selection of colours for new custom palettes.
Much Better Multi-Object Copy-Paste Between Documents
or Clipboard
Previously in Photo-Paint version 8, I often experienced times when
I needed to copy multiple selected objects to the clipboard to paste
them into a New image or an existing one. PP8 only ever seemed to copy
the primary selected object (the one with the red border in the Objects
docker, no matter which other objects were also selected or grouped.
PP9 changes this and copies multiple objects, along with all their properties
when copying. Yeah!
Printing Enhancements: Printer Preflight Checking
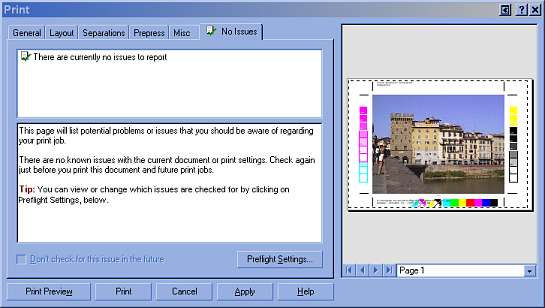
PP9 now includes an automatic Print Preflight Check with an extra
tab (called Issues) added to the Print dialogue box (Figure
42). If PP9 finds any contentious printing issues the icon
on the tab changes to an exclamation mark in a bright yellow triangle,
immediately alerting the user to any problems. The tab title shows the
number of issues found. Clicking on the Issues tab informs the user
of exactly what the problems are and suggested methods to fix them.
This checking is done very quickly and does not seem to add very much
extra time to that normally required to bring up the Print dialogue
box.
 |
|
Figure
42. The Print dialogue box showing the Preflight Issues tab contents
and the mini print preview pane.
|
 |
|
Figure
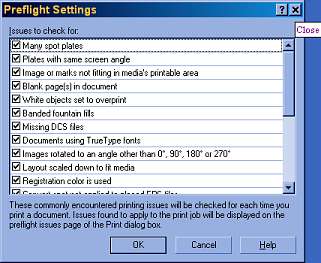
43. The checks that the Print Preflight undertakes can be easily
controlled.
|
The Print Preflight
tests that PP9 performs can be regulated by pressing the Preflight Settings
button on the Issues Tab of this dialogue box, and then selecting which
issues you would like checked (Figure 43).
Printing Enhancements: Miniature Print Previews
The Print Dialogue box shown above also allows for the viewing
of a mini Print Preview pane (Figure
42). This may save some time and screen space by allowing
the user to preview the result directly from this dialogue box rather
than having to go into the full screen Print Preview mode. The
mini Print Preview pane opens and closes from the dialogue box when
the small arrow on the far top right of the box is pressed.
New Image Stitch and QuickTime / QTVR Support
and Output.
PP9 now supports import and export of both QuickTime and QuickTime VR
movies.
 |
|
Figure
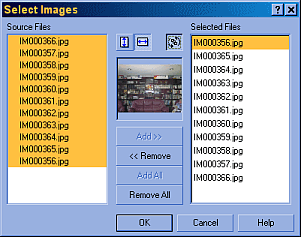
44. The new image stitch feature (first dialogue box) for the
selection of images to stitch together.
|
To support the construction
of QTVR movies, PP9 also comes with a new enhanced Stitch feature
(Image > Stitch). The new stitch feature comes as two dialogue
boxes. The first used to collect the images required for the stitching
process (Figure 44). The images
must already be loaded into PP9 before they appear in the Source
Files list. Once added to the selection, the order of the images
can be rearranged by clicking the rearrange icon (top-centre-right with
rotation arrows), or by dragging the image name between other image
names. The stitch process
can be made to occur vertically of horizontally but not square or rectangular
with multiple rows or columns.
Unfortunately, the PP9 Image
Stitch feature only stitches in one direction (clockwise or top
to bottom). I have a Canon PowerShot A5 digital camera which comes with
a Stitch-Assist program onboard to help me make panoramas. The camera
program helps the photographer create a series of overlapping images
by displaying a partial view of the previous image in the series to
help line up the next image. The Cannon program creates the image series
in an anti-clockwise direction, lining up the left edge of the
first photo with the right edge of the next photo. The PP9 stitch program
stitches images in a clockwise direction. Thus, the images I
took with my Canon A5 digital camera could not be used in the PP9 program.
Luckily I found another series (taken clockwise) to test out PP9's stitch
feature.
 |
|
Figure
45. The stitch program (second dialogue box) is used for adjusting
the overlap between adjacent images.
|
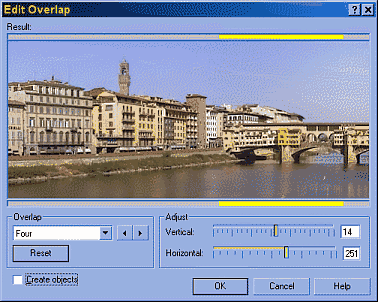
Once the images you need
for the stitching process are selected, a second dialogue box opens
to edit the overlaps and produce the final stitched image (Figure
45). Generally I found the program to work well, albeit more
slowly that I would have liked. The stitch program that came with my
camera worked much faster with more automatic features and better merging
of overlapped images. The lack of a hand panning tool to help align
images in PP9's stitch was a big omission I feel. However, the final
result from PP9's stitch was satisfactory with almost invisible joins
where the separate images were merged. I needed to manually crop the
final image to remove the uneven overlapped white spaces at the top
and bottom of my stitched image, whereas in the A5 camera stitch program,
the crop feature was already included in the stitch program. The stitched
image (before cropping) from one of my experiments is shown in Figure
46.
 |
|
Figure
46. Stitched images still requiring cropping.
|
Creating a QuickTime VR (QTVR) Movie
Once a panorama is constructed it is a relatively simple task to make
a QTVR movie. QTVR movies are not movies as such with frames that display
sequentially like a regular movie. A QTVR panorama movie displays
a small window containing a much larger panoramic image. The viewer
can pan the large image inside the window and even zoom in and out.
They are excellent for displaying large areas in a small space and can
allow the visualisation of a complete 360 degree 3D space such as a
room or studio.
You can also make a QTVR
3D Object movie in which an object can be rotated as if the camera was
mounted on a spherical set of gimbals.
Before making a QTVR movie
there are a few things to keep in mind:
- If you start from an image
(as in the case of a panorama) you must first convert you image into
a movie (Movie > Create From Document) or else the QT and QTVR
options will not show up in the Save, Save As or Export Dialogue boxes
- The starting image or
movie must be 24 bit
- The horizontal size of
the image in pixels must be divisible by 4. If necessary, the image
can be resampled or cropped a few pixels to ensure this.
- A movie with only a single
frame will export as a panoramic VR movie while a multi-frame movie
will export as a 3D Object VR movie
- Objects in any non-background
layers can be used as 'Hot Spots' to link to intermovie nodes or URLs
(web links).
 |
|
Figure
47. The Quick Time VR Export (panorama) dialogue box.
|
Once these conditions are
met you can use Save, Save As or Export to create your QTVR movie by
selecting MOV-QuickTime VR in the Files of Type dropdown
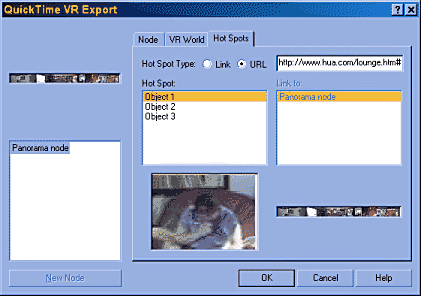
list in any of these dialogues. Following this, the QuickTime VR Export
Dialogue box appears (Figure 47).
In this dialogue there are 3 tabs. The Node tab allows for various
compression codecs to be used (depending on which is installed on your
computer). The VR World tab allows the user to set the size of
the window in which the panorama is viewed, and the last tab, Hot
Spots, allows for the linking of hot spots to movie nodes or web
URLs.
Better Compatibility: PDF, PSD, RIF, CDR, EPS
and other file formats.
PP9 provides improved compatibility with some important 'standard' type
formats such as Adobe® PhotoShop®
PSD, Acrobat® PDF and Corel Draw®
CDR files, and also new support for additional images formats such as
MetaCreations® Painter®
RIF format. The improved PSD compatibility now supports the preservation
and manipulation of PhotoShop Layers during import and export.
When Corel Draw CDR files are imported directly into PP9, the object
path is preserved so that it can be used as a mask.
Both PP9 and Draw 9 have
a new Publish to PDF option under the File menu which allows for the
easy creation of Adobe Acrobat 3 PDF files. The Publish to PDF
options include choice of image compression methods, image downsampling
to grayscale or monochrome, image colour mode as RGB or CYMK, the inclusion
of bookmarks, thumbnails, hyperlinks, ICC profiles, job tickets, and
users can also save their favorite PDF output settings as a style for
easy recall for future documents.
New EPS export features
in PP9 include better bounding box options, Bitmap image compression,
postscript compatibility options, and enhanced colour management management
features. PP9 now also includes support for Postscript Printer Description
(PPD) files so that users can directly access postscript printer setup
features via the PPD.
Much, much more...
These are just a few of the many enhancements and new features in Corel
Photo-Paint 9. I have tried to cover most of the important new features
but time restrictions prevent me from covering all of the changes. At
my last count I reach well over 100 significant differences between
version 8 and and version 9 and I was still a long way from finishing
the count. You will just have to buy or try the program and see these
all for yourself! Corel has 30 day trials available for those wishing
for a hands-on, risk-free raod test. I love it and think all Photo-Paint
users should aim to upgrade or purchase as soon as they can.