Copyright © 2001, David Mutch & Visionary Voyager Corp. P/L
| SIMPLE TEXT EFFECTS TUTORIAL #1 |
 |
| <-prev | INTRO | PART 1A | PART 1B | PART 2 | PART 3 | PART 4 | PART 5 | CLOSE | next-> Copyright © 2001, David Mutch & Visionary Voyager Corp. P/L |
This method utilises Photo-Paint's Lock Transparency function, or masks to create text or object with soft emboss highlights and shadows.To learn more about Lock Transparency (what is it?) click here.Steps: |
|
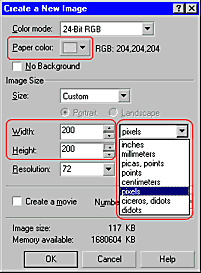
1. Create a new image. The Create a New Image dialogue opens.
|
 |
|
2. Change the Paint colour to cyan. If the colour palette is not present in the Workspace, open it using Window > Color Palettes > Default RGB Palette. |
|
|
3. Create a letter ‘A' object.
|
|
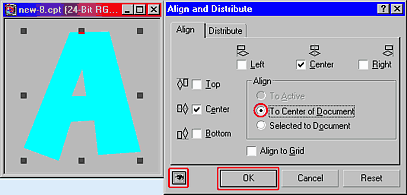
| 4. Align the ‘A' object to the centre of the image. From the menu choose Object > Arrange > Align and Distribute. Choose ‘To Center of Document' then press OK. The Character is now centred to the image. |
 |
|
5. Apply the Emboss Effect (Effects > 3D Effects > Emboss).
Press OK. |
 |
|
6A. (Lock Transparency method). To learn mode about Lock Transparency (What is it?) click here. Ensure that the ‘A' object is still selected. Press the Lock Transparency button.
6B. (Mask method). If the mask marquee is visible ( Mask > Marquee Visible, CTRL+H, or |
|
Both methods continued...
|
|
|
7. Apply a Gaussian blur ( Effects > Blur > Gaussian Blur ).
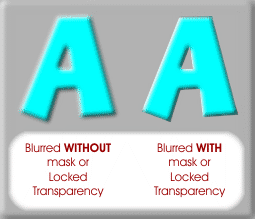
The image opposite shows the difference between simply blurring the object without constraints and the effect obtained when the limit of the blur is constrained using either a mask or the Lock Transparency function.
|
 |
|
|
If you like, you can enhance the effect even further through lightening the highlight more ( Image > Adjust > Brightness-Contrast-Intensity (B = 0, C = 5 to 8, I = 5 to 8), and add a light drop shadow |
|
<-prev | INTRO | PART 1A | PART 1B | PART 2 | PART 3 | PART 4 | PART 5 | CLOSE | next->
Copyright © 2001, David Mutch & Visionary Voyager Corp. P/L |
||||