|
Part 5: |
|
The Aussie Night Sky. |
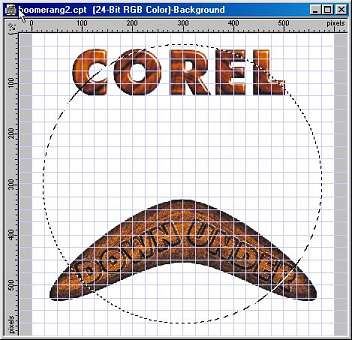
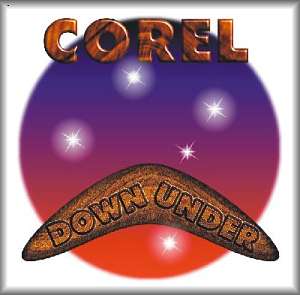
The current logo (see insert) has a nice red-blue twilight sky (often seen in the Australian Outback) with the Southern Cross constellation shown. Let's see what PHOTO-PAINT can make of this. Now we need our grid and ruler back.
|
Insert: Our current logo |
The twilight backdrop mask.
- Turn on the grid, ruler and snap to grid from the View menu.
- Turn the Show Mask Marquee feature on (if it isn't already) to see if any masks are present. If so, select Mask/Remove.
- Open the Mask Tools Flyout from the ToolBox and select the Circle Mask Tool. Make sure the + symbol (additive) on the Property Bar is selected. Click and hold on the x300, y300 (centre point) of the grid, then hold down both the shift and the ctrl buttons and drag the mask marquee out to the x25, y300 grid point (the first grid set in from the image border, Figure 15).
- Save this mask as a channel called "circle".
|
Figure 15. |
Feather the circle mask.
- Select Mask/Shape/Feather, and use a width of 15, direction inside, edges curved, then click If you wish you can also save this mask as a channel (eg. 'feathered circle").
Convert the mask to an object.
- Select the Objects Picker Tool, then deselect Lock Transparency on the Objects Docker if it is currently checked. Create a new object (New Object icon in the Objects Docker) and rename the object 'circle".
Fill the object with an Outback night sky.
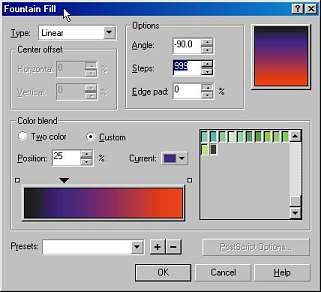
- With the new blank object selected, click Edit/Fill to open the Fill dialogue box. Click the Fountain Fill icon then click Edit...
Adjust the settings as shown in Figure 16 and as follows:
- Change the angle to -90 degrees and the steps to 999.
- Click the Custom colour blend radio button. Select 100 black as the Left hand edge colour and R255 G0 B0 (100% red) as the right hand edge colour.
- Double click the colour blend about 1/3 of the way from the left and adjust the position to 25%.
- Click the Current colour swatch at this position then select Other and adjust the colour to R51, G0, B153 (a Web friendly colour too!).
- Click OK to close the colour selection dialogue then OK again to create the fountain fill.
|
Figure 16. The Fountain Fill dialog box for the night sky fill. |
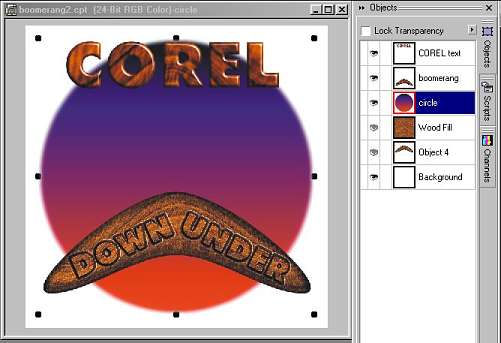
- Change the object order in the Objects Docker by dragging the circle object to just below the boomerang object.
- Turn off the Grid, Snap to Grid and the Mask Marquee to get a clearer view. (Figure 17).
|
Figure 17. The basic night sky Fountain Fill and the current Objects Docker. |
A new transparent object for the night sky stars.
- Click New Object on the Objects Docker and rename it stars´.
Painting in the stars 1 - radial arms.
A special brush shape was used to create the stars on a new transparent object.
- Choose white as the paint colour.
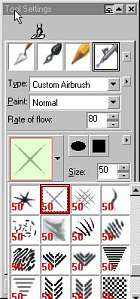
- Select the Brush Tool and select the X shaped nib from the Nib Shapes dropdown in the Tool Settings Rollup (Figure 18). Initially, leave the settings at their defaults.
|
Figure 18. The `star streak´ brush nib to be used. |
- To aid positioning the stars, I turned the grid, ruler and snap to grid features back on (refer above if you still need help with these features).
- Click once or twice on the following points: x300, y150; x300, y500; x150, y250; x450, y250; and x375, y325 for the little star. You may discover that leaving the mouse button depressed causes more paint to flow and thus really does act like a paint sprayer.
- Now alter the settings for this nib in the Tools Settings Rollup: size 30, transparency 20, rotate 35. Click on the same points several more times but less on the smaller star.
The star halos.
- Change the nib to the 100 size feather circle (nib number 12) and alter the Transparency to 50%. Click over the same points to create a halo but less on the smaller star.
- Finally, select the 30 size feather circle nib (nib number 5), leave the Transparency at the default and repeat the above process.
Rotate the entire sky object.
- With the stars object still selected, choose the Objects Picker Tool and click once on the stars object to bring up the rotation handles.
- Rotate the image about 10-15 degrees anti-clockwise, so that the lower star comes close to the under side of the boomerang's right arm.
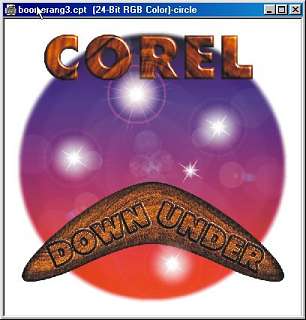
- Without the grid showing, you image should look like Figure 19.
|
Figure 19. The current image. |
Lens Flash. (To add to the realism a little)
- Turn off the Grid and Snap to Grid features if they are still on.
- Select the circle object in the Objects Docker. Click on the Paint Tool.
- In the Tool Settings Rollup with the Airbrush selected, choose the second smallest nib shape.
- Place a white dot on the circle object in the centre of each of the four larger stars. (Make the star object invisible to see it.)
- With the circle object still selected, choose Effects/Render/Lens Flare to open the Lens Flare Dialogue box.
- Position the crosshair on the small white point of the top star and change the settings to Lens Type 35mm Prime, Brightness 75%, Colour white. Click OK.
Repeat the process on the remaining three stars but at a brightness level of 70% with a 105mm Prime (Figure 20).
|
Figure 20. The current image with lens flash added. |
The Milky Way.
Finally, add some extra stars for the Milky Way.
- Select the stars object and the Paint Tool.
- In the Tool Settings Rollup with the same nib we previously selected, change the size to 4.
- Click the Dab Attributes tab along the top of the dialogue box (the centre tab) and change the number of dabs to 3 or 4, and both the Spacing and the Spread to 999. Starting in the white area just to the left of the left most star, draw 2 or 3 runs of stars up to the top right hand corner.
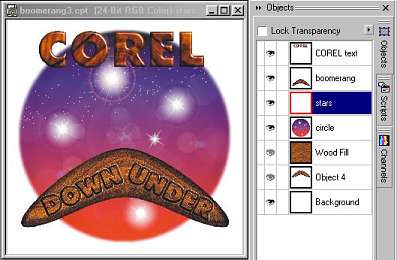
- In the Objects Docker, reposition the stars object to just above the circle object (below the boomerang, Figure 21).
|
Figure 21. |