 |
| Creating
a CANDY Text Effect in Corel Photo-Paint, by David Mutch, September,
2002.
The
method described here to create a candy text effect employs three
basic parts:
1) constructing a diagonal stripe tile,
2) creating a displacement map, and
3) applying parts 1 and 2 to the text itself.
The
effect can be done in version 8 and higher but is written using
version 10 so there are some minor menu command differences for
version 8.
You
should make up all the required components yourself - the tile,
the mask and the displacement map - as described in this tutorial
below. However, if you get stuck you can use the ones I used in
creating this tutorial by downloading THIS
ZIP file. If you do use these, unzip the file and place the
components in the suggested folders indicated in the steps below.
|
| STEPS:
PART
1: Creating a diagonal stripe tile.
There are a number of different ways such a tile can be created
but I found this method to be the easiest to follow for tutorial
purposes.
|
| 1.
|
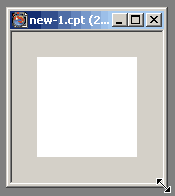 Create
a new image: Create
a new image:
24-Bit RGB, white background, 32x32 pixels (dpi is irrelevant here).
The
new image appears in the workspace.
To
make it easier to create our initial stripe, change the Zoom level
on the Toolbar to 300%, then drag on the corner of the new image
window and expand the window about an inch past the image boundary
(Fig 1 ->). |
|
| |
|
|
| 2. |
 Draw
the first line. Draw
the first line.
Change the Paint colour to Red, then select the Line Tool (L,
in the Rectangle Tool Flyout).
Change
the Property Bar settings to Shape Width = 16, Transparency = 0,
Paint Mode = Normal, Shape Joints = Butt, Anti-Aliasing = OFF, Render
to Object = On.
Place
your cursor as close as possible to the top RH corner of the image,
hold down the CTRL key and drag a line to the lower LH corner. Holding
down the CTRL key while dragging lines constrains the angle of the
line to 45 degree intervals.
Align
the line object to the centre of the document (Object > Arrange
> Align and Distribute, To Center of Document) (Fig 2 ->) |
|
| |
|
|
| 3. |
 Duplicate
then combine. Duplicate
then combine.
With the line object selected, duplicate it (CRTL+D).
Now
there are three objects: the white background, and two line objects.
Select
any line object and combine it with the background (CTRL+DnArrow).
Your
Object Docker should look like this: (Fig 3 ->). |
|
| |
|
|
| 4. |
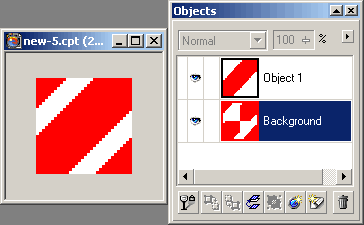 Offset
the background object. Offset
the background object.
Select the BACKGROUND Object.
Apply
an Offset Effect (Effects > Distort > Offset) with
both Horizontal and Vertical Shifts set to 50% and Undefined Areas
= Wrap Around.
Press
OK. (Fig 4 ->) |
|
| |
|
| 5. |
Combine
and save.
Combine all objects together (CTRL+SHIFT+DnArrow) and save
the image as a CPT file.
If
you want to find the file easily later when you use it as a bitmap
fill, save it in the default Bitmap Fill file that Corel uses: Graphics
X\Custom\Tiles (where X = your version of the Corel Draw suite)
. Suggested filename = red_stripe.cpt.
This
completes the construction of the diagonal stripe tile. If you had
difficulties in this section you can download and use the one I
have made HERE (This file contains
the tile, the mask and the displacement map required for this tutorial,
unzip before use). |
| |
PART
2. Creating the Displacement Map and mask base.
This effect relies on the use of a displacement map, specifically
created for the text involved. If you want t repeat the effect later
on different text or objects, you will need to recreate the displacement
map for the specific text or object involved.
|
| 1. |
Create
a new image:
24-Bit RGB, 100% BLACK background, 500x300 pixels at 300 dpi. |
| |
|
| 2. |
 Create
some white text. Create
some white text.
Change the Paint colour to White then select the text tool and create
some text.
Use
a thick rounded font and a size that uses much of the image area.
In
the example shown I used Swis721 BlkRnd BT at 24 points. Arial Rounded
and Helvetica Rounded are also great if you have them.
Centre
the text to the document. (Fig 5 ->). |
| |
|
| 3. |
Create
a mask from the text and save to Disk.
(CTRL+M) and the save this mask To DISK (as a FILE, not
as a Channel!).
Save
as a CPT file to a favourite location. Suggested filename = candy_mask.cpt.
|
| |
|
| 4. |
Remove
the mask the combine.
(CTRL+SHIFT+R) then combine the text object with the background
(CTRL+DnArrow).
Now
you have have a background with the centred text on it. |
| |
|
| 5. |
 Blur
the image Blur
the image
Apply a Gaussian Blur (Effects > Blur > Gaussian Blur)
using a radius of 3. (Fig 6 ->). |
| |
|
| 6. |
Save
the image as a Displacement Map.
Oddly, Corel uses PCX images as Displacement maps, although many
image formats can be used successfully.
To
make it easy to use this map later, save the image as a PCX file
in Corel’s default Displacement Map folder: GraphicsX\Custom\Displace
(where X = your version number). Suggested filename = candy_text_displace.pcx. |
| |
|
PART
3: Creating the Candy Text Effect.
As mentioned earlier, the displacement map used is specific for
the text used and the mask saved from the text shape. For different
text or objects, you will need to recreate the saved mask and displacement
map each time.
|
| 1. |
Create
a new image:
24-Bit RGB, WHITE background, 500x300 pixels, 300dpi. |
| |
|
| 2. |
Create
a new object.
(Object > Create > New Object, or use the icon
on the Objects Docker). |
| |
|
| 3. |
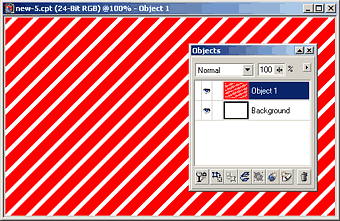 Load
and use the diagonal stripe bitmap fill. Load
and use the diagonal stripe bitmap fill.
Select the Fill (Bucket) Tool, then choose the Bitmap Fill type
from the Property Bar (red and purple chequered icon).
Click
the Edit Fill icon on the Property Bar to display the Bitmap Fill
dialogue box.
Click
the Load button. Locate and open the red_stripe fill you saved earlier.
Use
the default settings for Bitmap fills: Use Original Size, with all
other options set to 0. Click Ok to set this fill as the Bitmap
Fill type.
Now
click anywhere inside the image to fill the new blank object with
this fill. (Fig 7 ->) |
| |
|
| 4. |
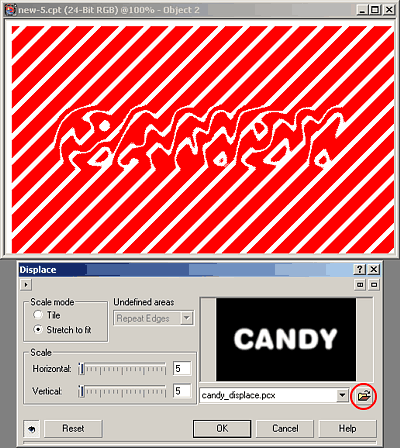 Apply
the displacement map. Apply
the displacement map.
Ensure the stripe-filled object is selected.
Apply the displacement map as follows: From the menu choose Effects
> Distort > Displace to display the Displacement Map dialogue
box.
Click
the folder icon to the right of the map filename and locate and
open the displacement map you saved earlier.
Adjust
the settings to Stretch to Fit and a value or 5 for both horizontal
and vertical scale.
You
could use different settings here, depending on the desired effect.
Then
Press OK
(Fig
8 ->) |
| |
|
| 5. |
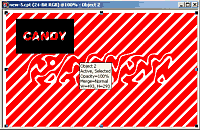 Load
the saved mask. Load
the saved mask.
Use Mask > Load > Load from Disk and locate and open the mask
you saved earlier. Click the cursor anywhere in your image to load
the mask at the default position (0,0,)
(Fig 9a ->).
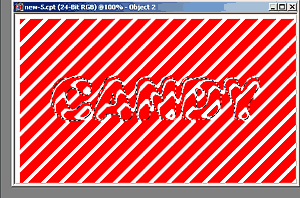
If
the Mask Marquee is Visible your image should look like Fig 9b (below).
The
way the mask loads will depend on the current Mask Mode setting.
|
| |
|
| 6. |
 Create
the object. Create
the object.
Use CTRL+SHIFT+I or Mask > Invert to invert
the mask.
Select
any Mask Tool and then press DEL.
This removes the area of the object enclosed in the inverted mask.
If
you don’t select a mask tool first the mask will be deleted
instead of the object. Just UNDO once if you do this.
The
red stripe may look a little chunky after the displacement. If so,
you can apply this optional step: Invert the mask again so only
the text shape is surrounded then apply a very light Gaussian Blur
(say, radius = 0.5).
Then
remove the mask (CTRL+SHIFT+R) (Fig 10 ->) |
| |
|
| 7. |
 Apply
a 3D Texture and a Drop Shadow. Apply
a 3D Texture and a Drop Shadow.
A 3D Texture or Effect will make the text look much better.
My
choice is the Plastic Texture in Photo-Paint 9+. Version 8 users
could use the Boss or Glass 3D Effect.
Make
sure the Text-shaped object is still selected then use Effects
> Texture > Plastic.
The settings I used were: Highlight = 95, Depth = 8, Smoothness
= 90, Light Direction = 315, Light Colour = White.
Click
OK.
Apply
a mild drop shadow. (Fig 11 ->) |
| |
|
| |
If
you like, add some extras such as another striped object, warped
and with eliptical transparency, and some lollies using the CandyList
Image List. This image list was originally available from www.designer.com
but if you can't find it there, you can get it here.
(Fig 12, below) |
| |
 |
| |
|
T
e x t E f f e c t s # 3
M e n u :
<- PREVIOUS || NEXT
->
|
| - Copyright
© 2001-2003 David Mutch & Visionary Voyager Corporation P/L - |
|
|
|


