|
Creating
Dramatic Text in Corel Photo-Paint
- by David Mutch, August 2002
This is possibly the easiest of all the tutorials I have ever written. It produces really great looking text AND it can be done in any version of Photo-Paint (at least as far as I can remember anyhow).
Although this effect can be applied to text of almost any font, it works best (as designed here) using tall, elegant, medium thickness, condensed, sans serif fonts.
However, eEven if you can’t find a suitable condensed font, it is very easy to transform any font to suit the task.
STEPS:
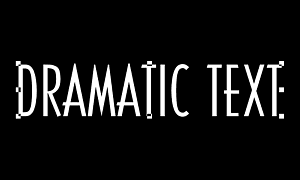 Fig 1. |
1.
Create a new image. 2.
Create some white text. Choose a font from the Property bar and change the font size to about 28 points Then create your text. In the example shown I used a font called Casandra. Centre the text to the image using Object > Arrange > Align and Distribute, then Center to Document. (Fig 1).
|
|
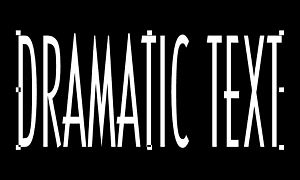 Fig 2. |
3.
Stretch the text vertically. Hold down the SHIFT key and drag the top-centre node upwards until it the text covers about 2/3 of the vertical space of the image. The actual amount of vertical scale will depend on the initial font and point size you used. Double-click on the text object to APPLY the size transformation (or right-click and choose Apply). (Fig 2).
|
|
4.
Duplicate the text object and offset it slightly.
If not open already, open your Objects Docker to see the two objects.
|
||
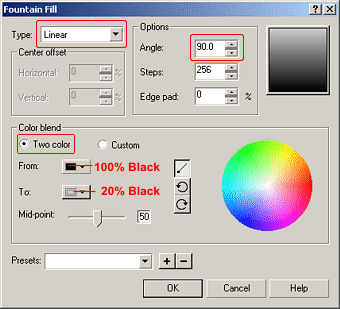 Fig 3. |
5.
Set up a linear Fountain Fill. Choose these settings:
(Fig 3) |
|
6.
Lock the Object’s Transparency This prevents any fill from ‘spilling’ out past the object’s boundary.
|
||
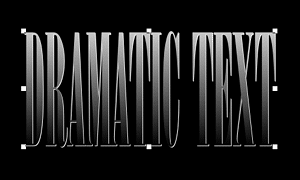 Fig 4. |
7.
Fill the upper text object with the fountain fill. Just ensure that the Current Fill radio button is selected (it is by defalt) in the Edit Fill and Transparency dialogue box when you fill. (Fig 4)
|
|
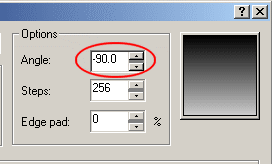 Fig 5. |
8.
Reverse the direction of the Fountain Fill. In the Fountain Fill dialogue box, change the Angle to -90. An easy way to do this is to click in the angle spinner box and just add a ‘minus’ sign in front of the number. (Fig 5).
|
|
|
9.
Fill the lower text object with the reverse fill. (Fig 6 - below). |
||
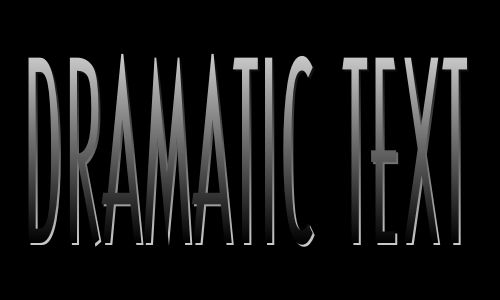 Fig 6. |
||
NOTES and VARIATIONS:
1. The two text objects can be grouped or combined and copied into another image.
2. Add an extra layer between the text and the background, set up some soft, feathered masks and fill with a bright texture. Add some Lens Flares (from KPT6)

Fig 7.
3. Fonts.
You can get heaps of free and interesting fonts off the web. Visit www.acidfonts.com or www.hardcovermedia.com for a nice choice. Some of the other fonts which I found were good to use for this effect were: (** = elegant)
| Americana
Dreams Condensed, Amsterdam Tangram Arcitectura Lefty ArsisDReg Belmar CondensedLight-Normal Black Adder II Lefty Black Adder II Bodoni BdCn BT Bodybag Cassandra ** Clarnel-SemiBold-Italic |
Covington
SC Cond Crash Creature Diner Fatt ** Discount Inferno Dreamspeak East Side Bold Edition Empire BT ** Fountainpen ** FundRunk-Normal** and many more. |
4. More Examples:

Fig 8.

Fig 9.
| T e
x t E f f e c t s # 3 M
e n u : <- PREVIOUS || NEXT ->
|
||||||||||||
|
||||||||||||