

|
|
|
|
| Introduction | ||||
| Charcoal | ||||
| Conté Crayon | ||||
| Crayon | ||||
| Cubist | ||||
| Dabble | ||||
| Impressionist | ||||
| Palette Knife | ||||
| Pastels | ||||
| Pen and Ink | ||||
| Pointillist | ||||
| Scraperboard | ||||
| Sketch Pad | ||||
| Watercolour | ||||
| Water Marker | ||||
| Wave Paper | ||||
13. Watercolor.
The Watercolour Art Stroke makes an image look like a watercolour painting. You can specify the brush size, granulation level, and image brightness. You can also specify the intensity of the colours and determine the degree to which the colours blend.
The Watercolor art stroke transforms an image into a watercolour painting and acts a little like the watercolour brush in Corel's Painter 7 product. Just like using real water colour paints, you can adjust the amount of 'water' added to the mix and the amount of 'bleed' you require, as if you wee allowing the brush to sit for a time on the 'paper'.
Many types of images are suitable for use with this art stroke,
but landscapes and mountain scapes (like Chinese watercolours) may be just about
perfect.
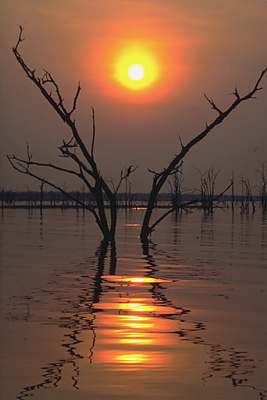
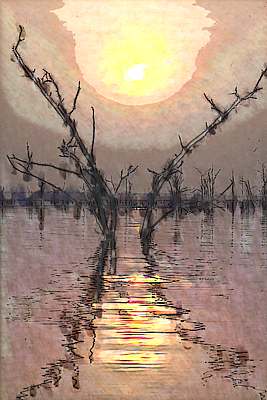
1. Choose a suitable image. For the example here I have selected image 790009.WI from the PHOTOS/EVE_SKY folder from Corel Draw Suite 8. (Fig 1)
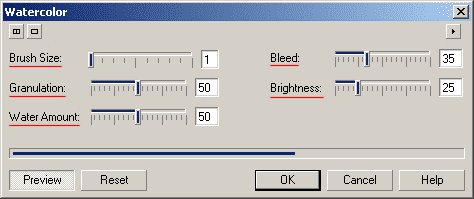
2. Open the Watercolour dialogue box (Effects > Art Strokes > Watercolor). There are five control parameters: Brush Size, Granulation, Water Amount, Bleed and Brightness. All five have a distinct effect on the result. (Fig 2)
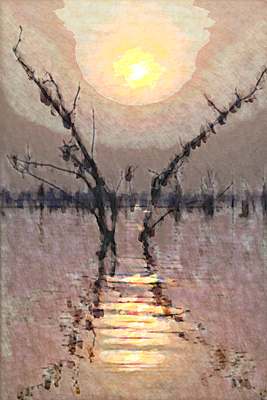
3. Click the Reset button on the dialogue box to see the effect using the default settings. As you can see, the image is converted into a watercolour type painting complete with the runny bleeds often seen when using watered-down acrylic paints, or as in traditional Chinese style paintings. (Fig 3)
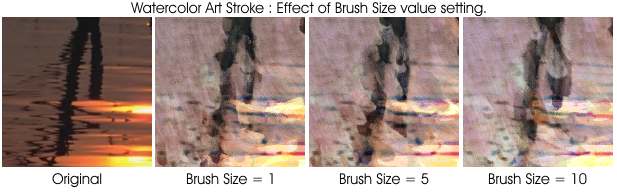
4. The Brush Size parameter not only affects the size of the brush used but also affects the colour detail remaining in the image after the effect has been used. The greater the brush size value, the greater the loss of colour detail. Edges and regions of strong contrast do not seem to be affected though. (Fig 4)
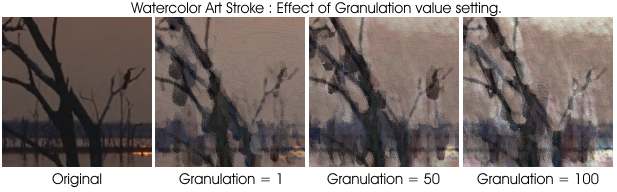
5. The Granulation parameter alters the amount of smoothing between the brush strokes and also adds more white 'paper' splotches to the image as it is increased. Lower values give a smoother result but make the result look less like a true water colour image which is often 'blotchy'. (Fig 5)
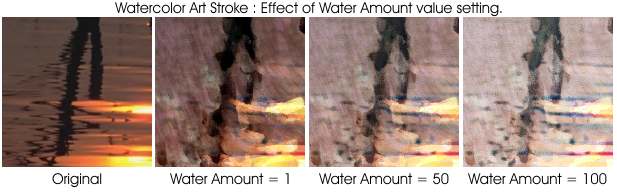
6. The Water Amount parameter allows you to 'water down' your paints, making the result lighter and more transparent to the underlying 'paper'. Increasing this value makes the image lighter and the colours less saturated. (Fig 6).
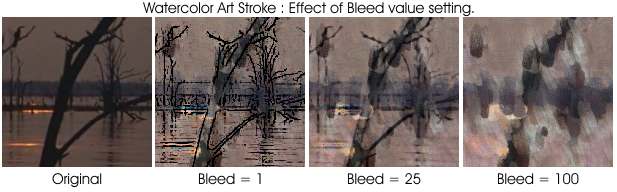
7. The Bleed parameter changes the amount of edge detail in the result. Possibly this parameter should have been called Edges or something like that. Low values simulate beautiful black edge detailing with a fine brush, outlining the areas of major contrast. Higher values case the edges to 'bleed' into the rest of the image, blurring and diffusing them. (Fig 7)
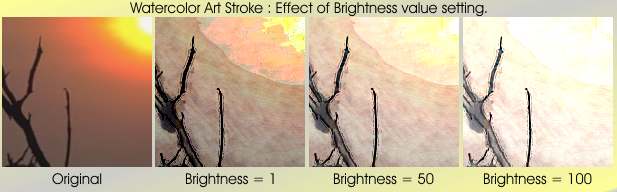
8. The final parameter, Brightness, does exactly what it says and increases the brightness of the image as it value is increased. At low values the brightness of the original image is maintained so there doesn't appear to be any way to darken the image, only brighten it. At high values the brightness can be too much and ruin the effect somewhat. (Fig 8)
Here is the final image with my choice of settings (Fig 9)
9. Here are some more examples of using this great art stroke:
Fig 10: A Teddy bear using two different watercolour settings.
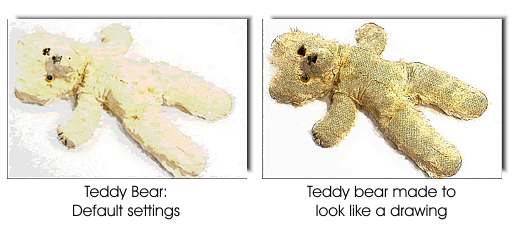
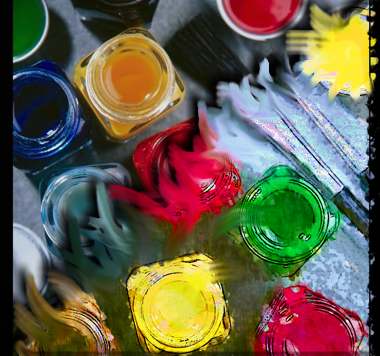
Fig 11. Paint pots: image was duplicated the a watercolour effect applied to the duplicate. Half the duplicate was deleted, then smears made with the Smear Effect Brush Too and a drop shadow added.
| « Prev | || | || | Next » |
| - More Tutorials - | - Contact Me - | |
| - Copyright © 2003 David Mutch & Visionary Voyager Corporation P/L - |